Enabling Observability for AWS Services
4.1 EC2
4.1.1 Default Metrics
By default, AWS provides basic monitoring. It includes CPU, Network, Disk and Status Check metrics which are collected at every 5-minute interval. Detailed monitoring can be enabled to get metrics for every 1-minute interval.
4.1.2 Enable Custom Metrics
By enabling custom metrics, system can get more metrics than the default metrics of EC2. Steps as follows.
4.1.3 Assign IAM role to EC2 instances
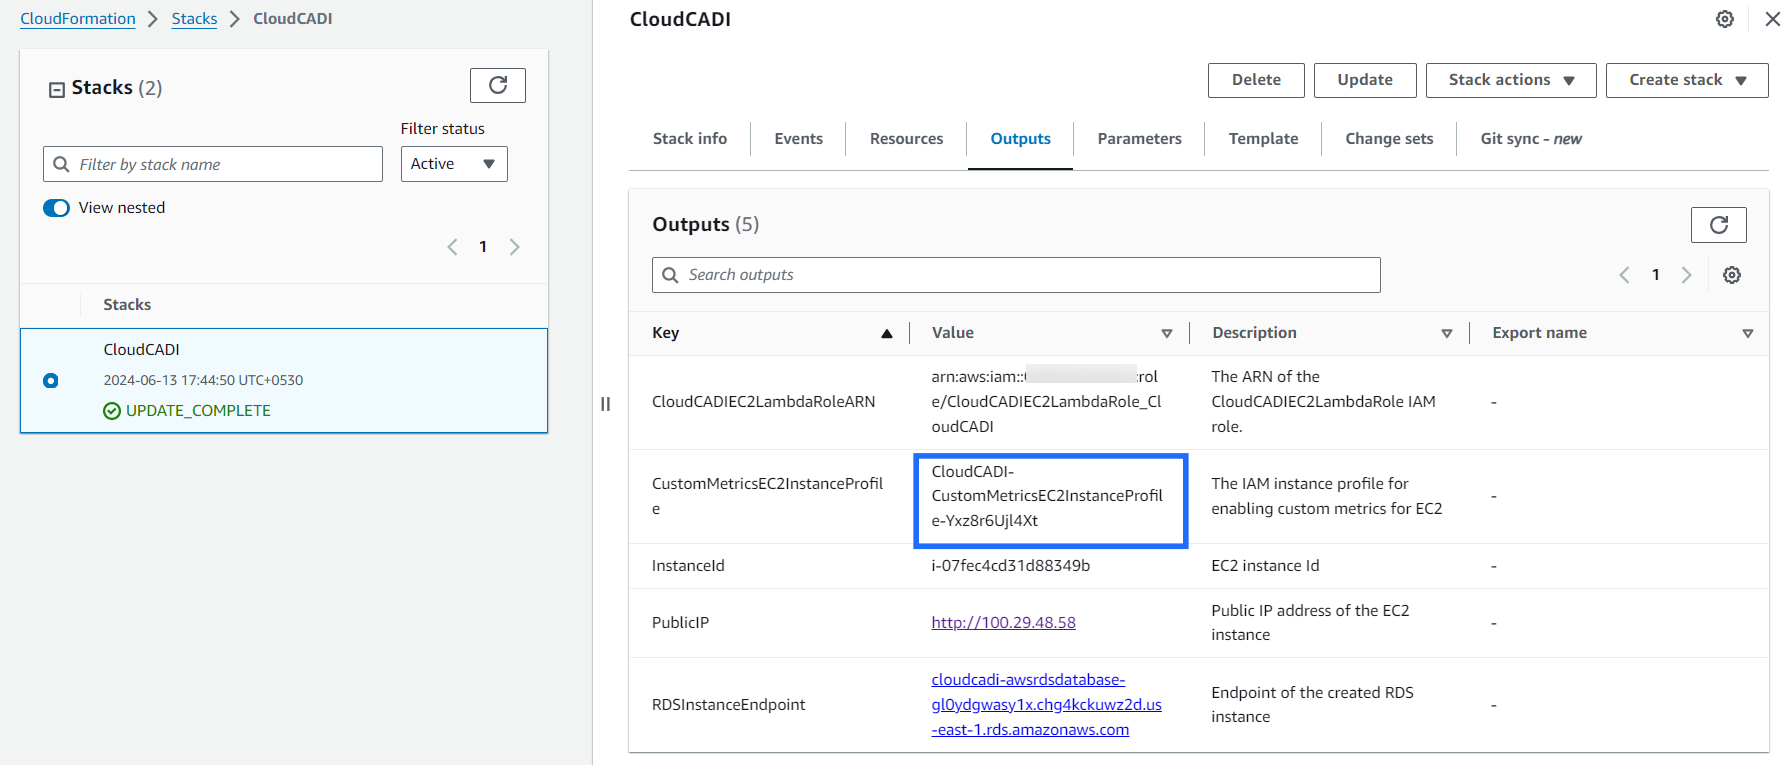
- Go to the CloudFormation Stack Outputs tab which was created in the Data Storage and Transformation and copy the CloudCADIEC2CustomMetricsRole.
- Go to EC2 console -> Instances.
Note
- For collecting the custom metrics data for the EC2, we need to assign the role to EC2 instance to push metrics to CloudWatch.
- Select the instance which you want to enable memory metrics.
- Actions -> Security -> Modify IAM role.
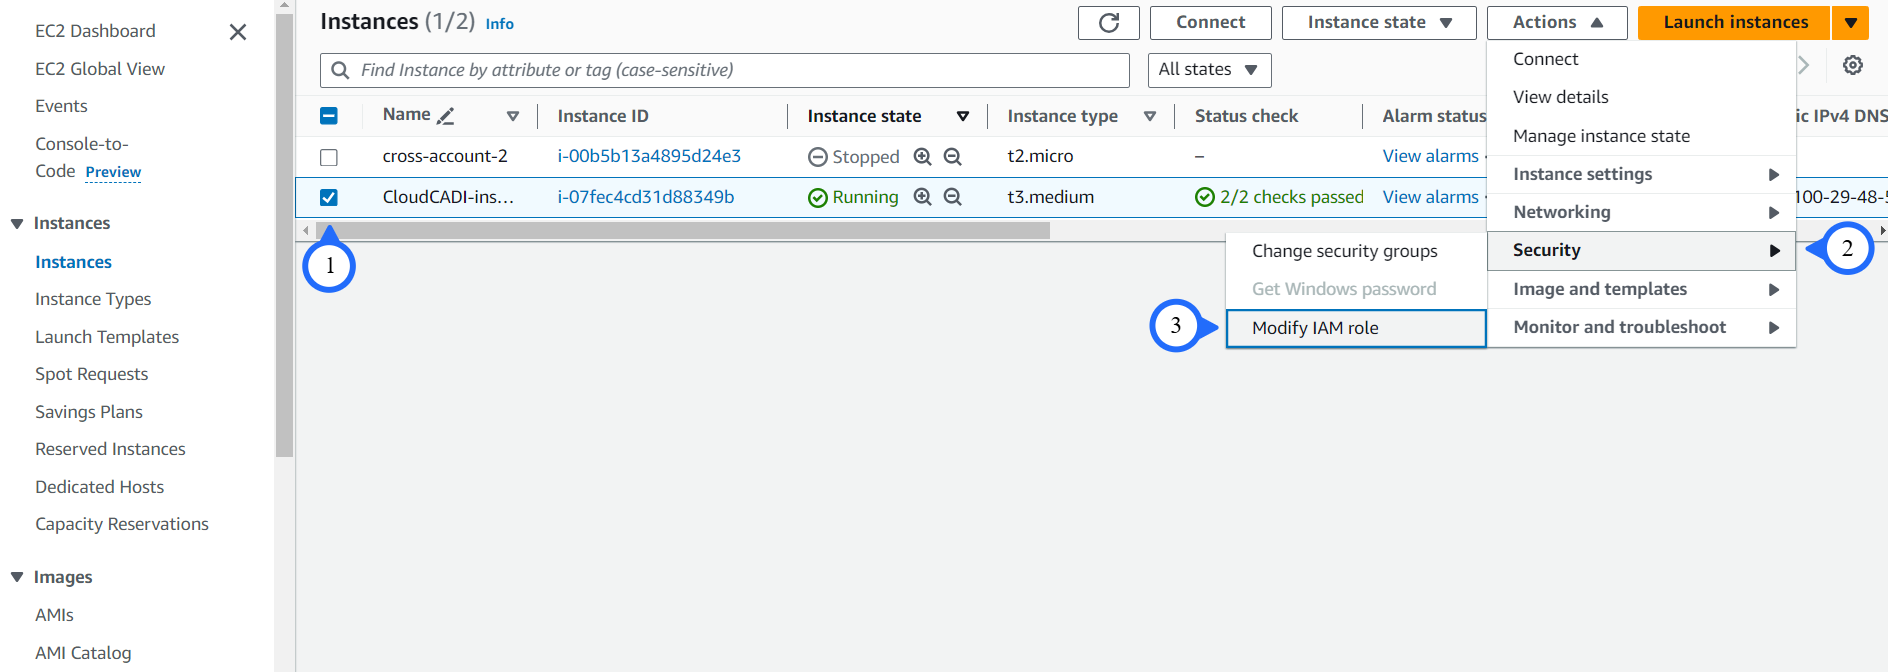
- Search the role name which you copied for the CloudFormation stack Outputs tab and select the role.
-
If the instance is already attached with any role, then you have to add the below policies to the existing role.
a. CloudWatchAgentServerPolicy b. AmazonSSMManagedInstanceCore -
Click Update IAM role.

4.1.4 Create Parameter to Store Common Configurations
One policy enables CloudWatch agent to be installed on a server and send metrics to CloudWatch. The other policy is needed to store CloudWatch agent configuration in Systems Manager Parameter Store. Parameter Store enables multiple servers to use one CloudWatch agent configuration.
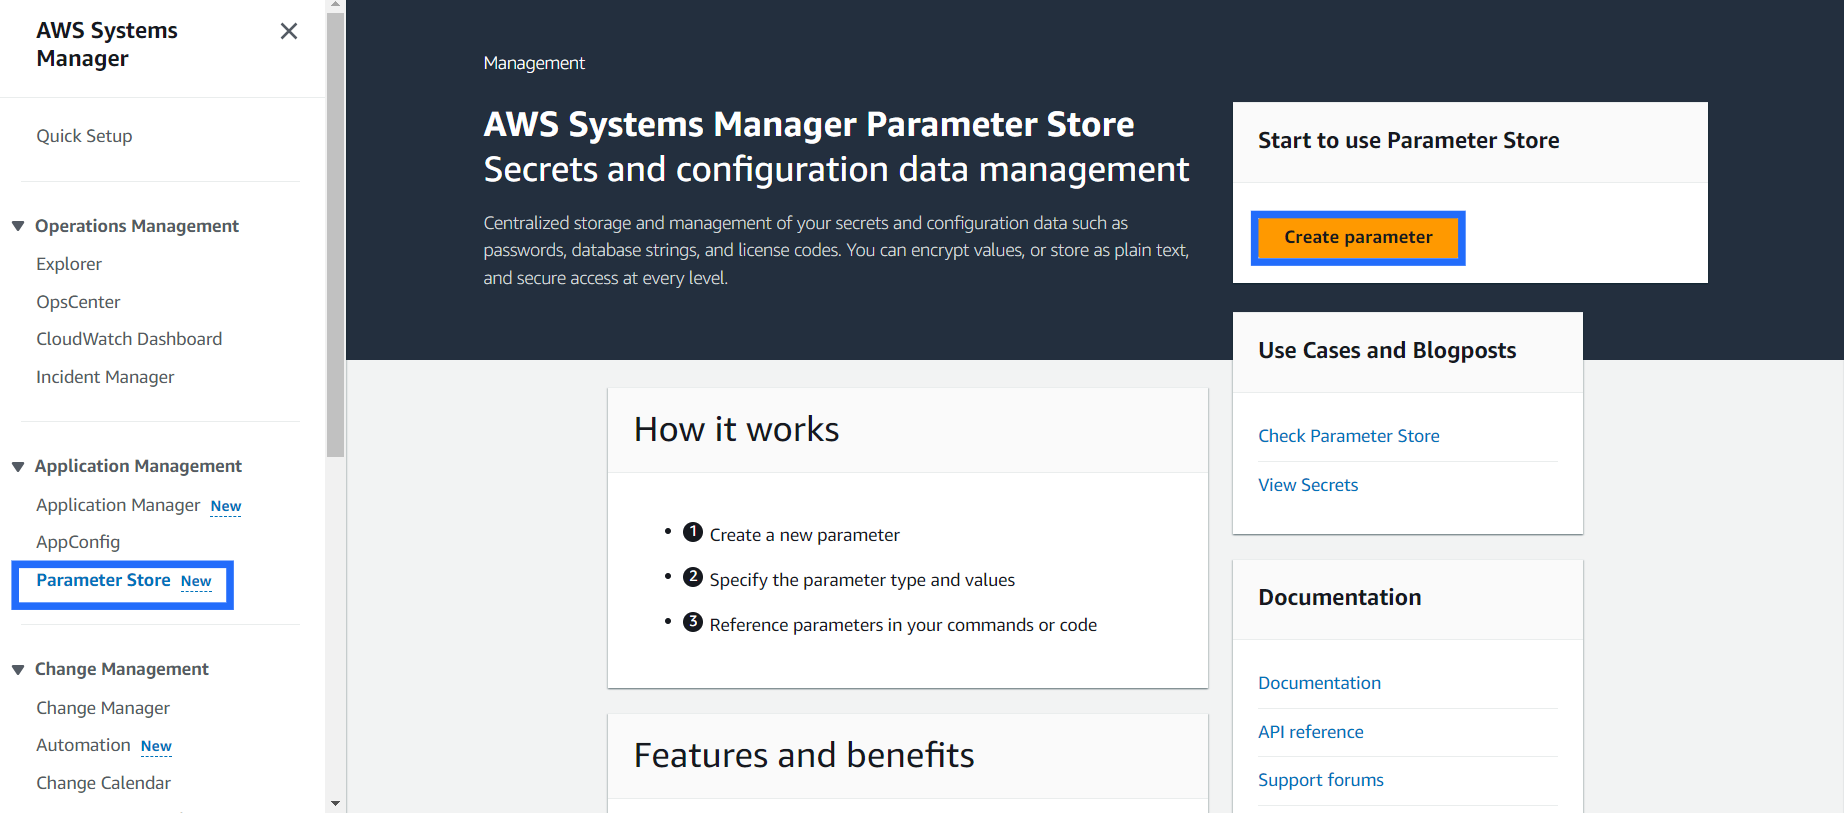
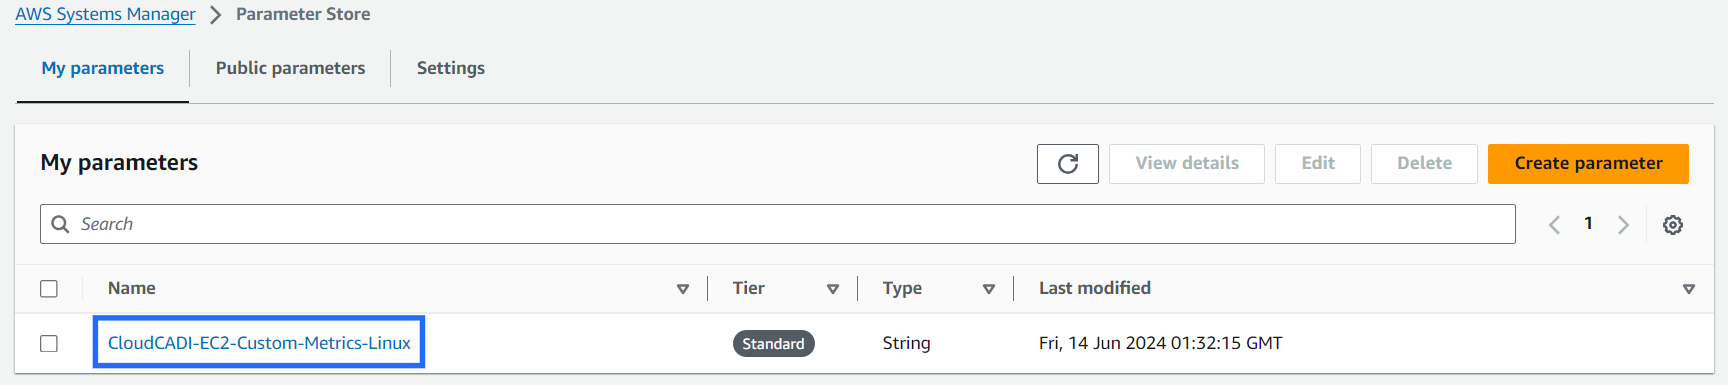
- Go to Systems Manager console -> Parameter Store -> Create parameter.
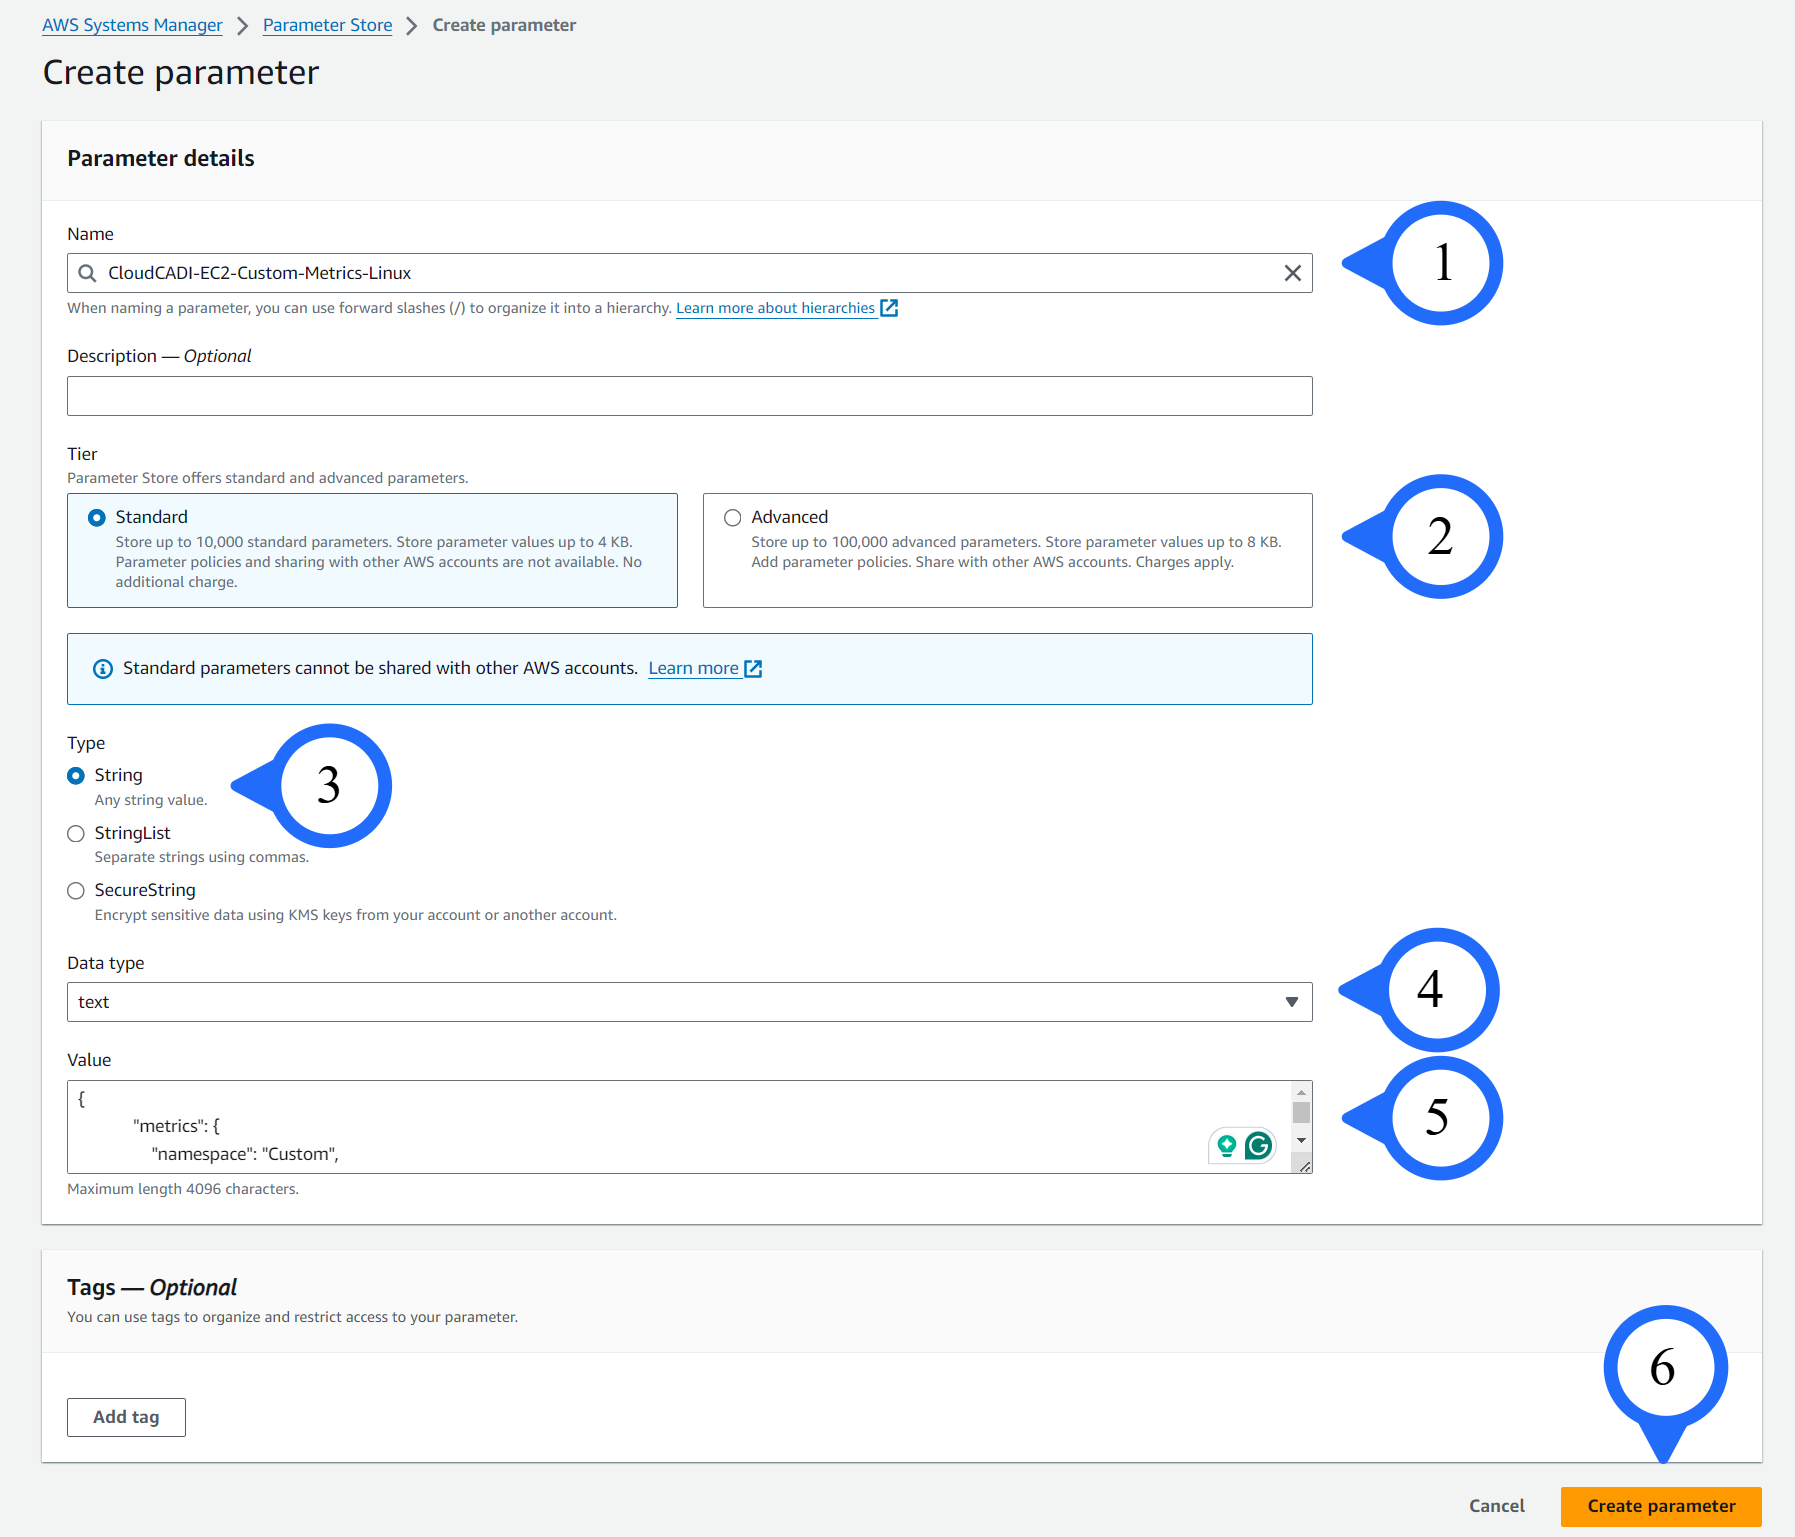
- Enter the parameter as given below and Click Create Parameter.
For Linux
    Name : CloudCADI-EC2-Custom-Metrics-Linux
    Tier : Standard
    Type : String
    Data type : text

    Value:
       {
        "metrics": {
          "namespace": "Custom",
          "append_dimensions": {
            "InstanceId": "${aws:InstanceId}"
          },
          "metrics_collected": {
            "mem": {
              "measurement": [
                {
                  "name": "mem_used_percent",
                  "rename": "memory_used_percent"
                }
              ],
              "metrics_collection_interval": 60
            }
          }
        }
      }
For Windows
    Name : CloudCADI-EC2-Custom-Metrics-Windows
    Tier : Standard
    Type : String
    Data type : text

    Value:
       {
        "metrics": {
          "namespace": "Custom",
          "append_dimensions": {
            "InstanceId": "${aws:InstanceId}"
          },
          "metrics_collected": {
            "Memory": {
              "measurement": [
                {
                  "name": "% Committed Bytes In Use",
                  "rename": "memory_used_percent"
                }
              ],
              "metrics_collection_interval": 60
            }
          }
        }
      }
4.1.5 To Install AmazonCloudWatchAgent
Once EC2 is assigned with proper IAM role, wait for 20-30 minutes then go ahead to run a command.
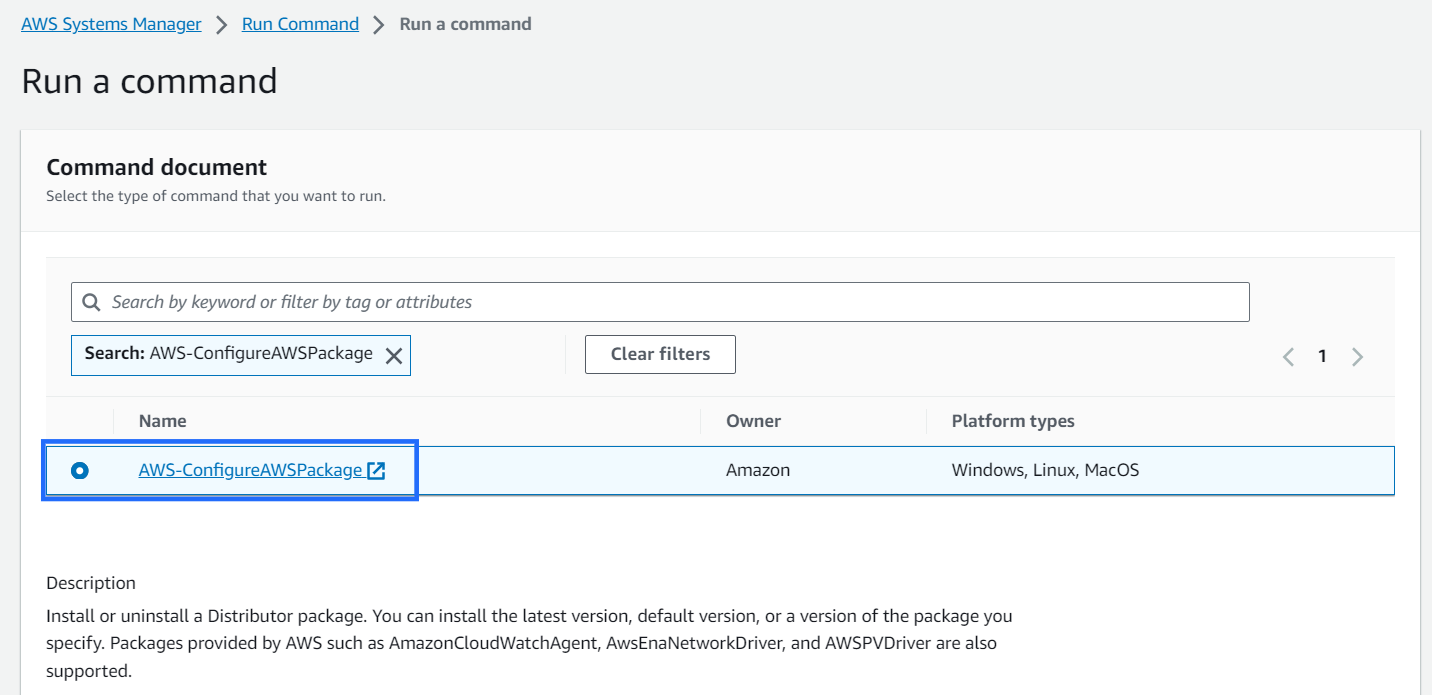
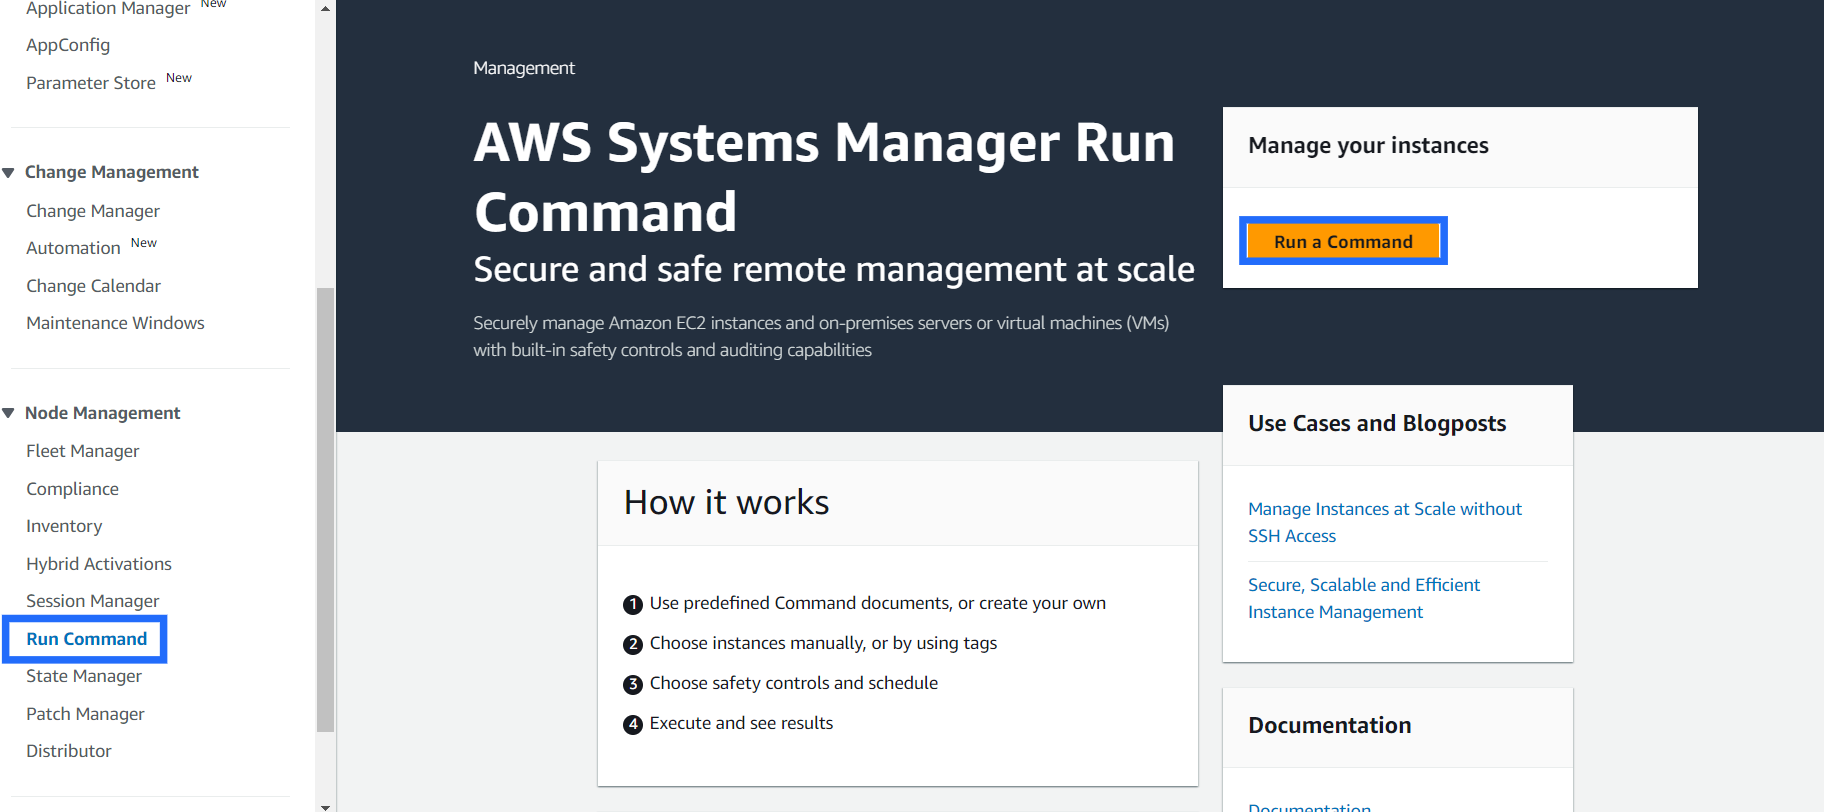
- Go to Systems Manager console -> Run command -> Run a command.

- In Command document Search “AWS-ConfigureAWSPackage” from the command list and select.
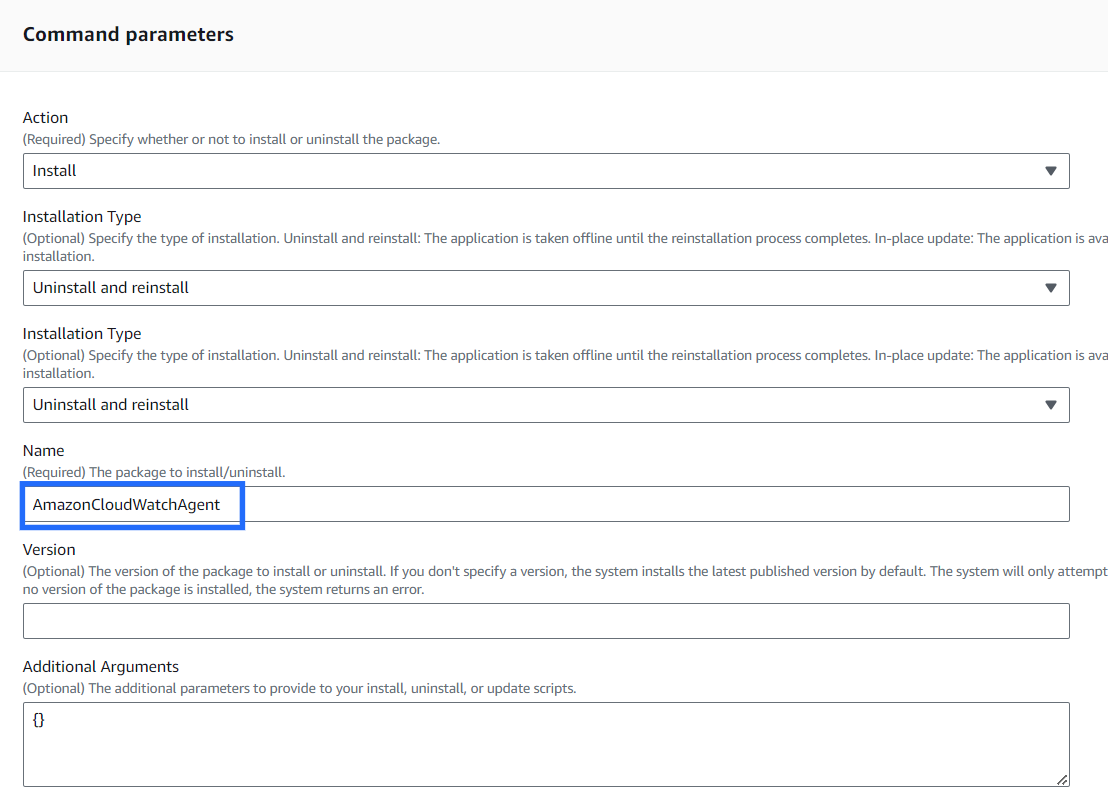
Command paramters
- Name: AmazonCloudWatchAgent
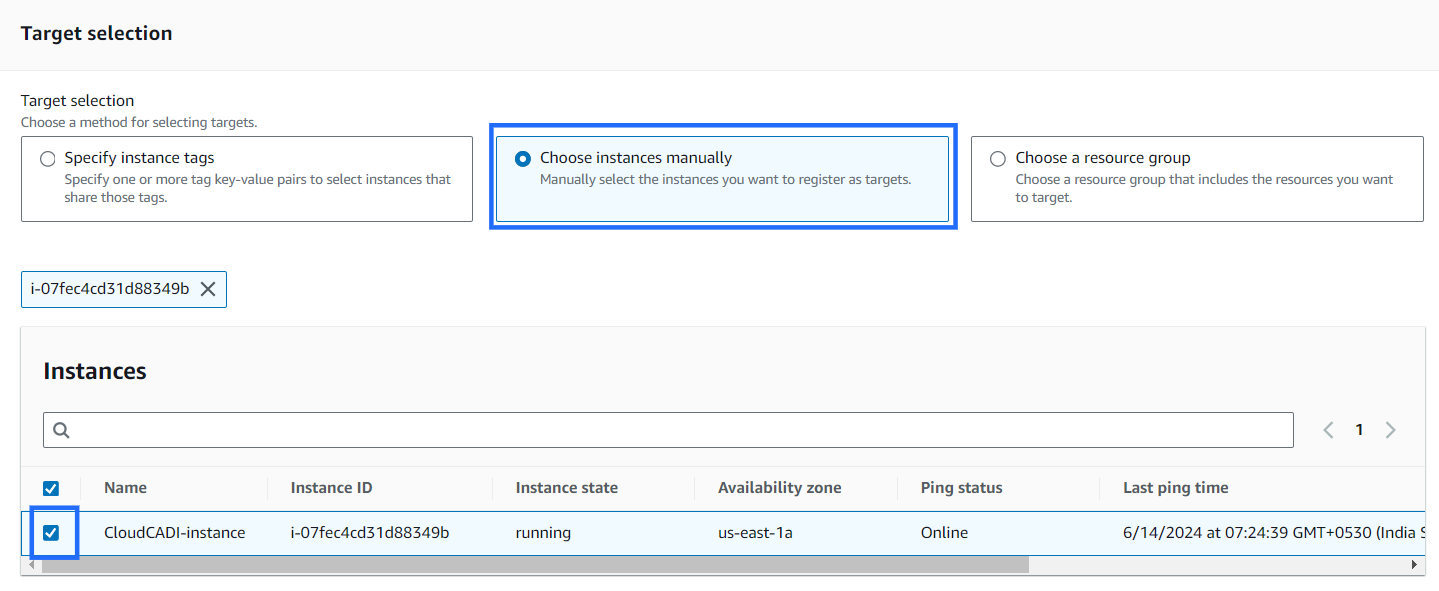
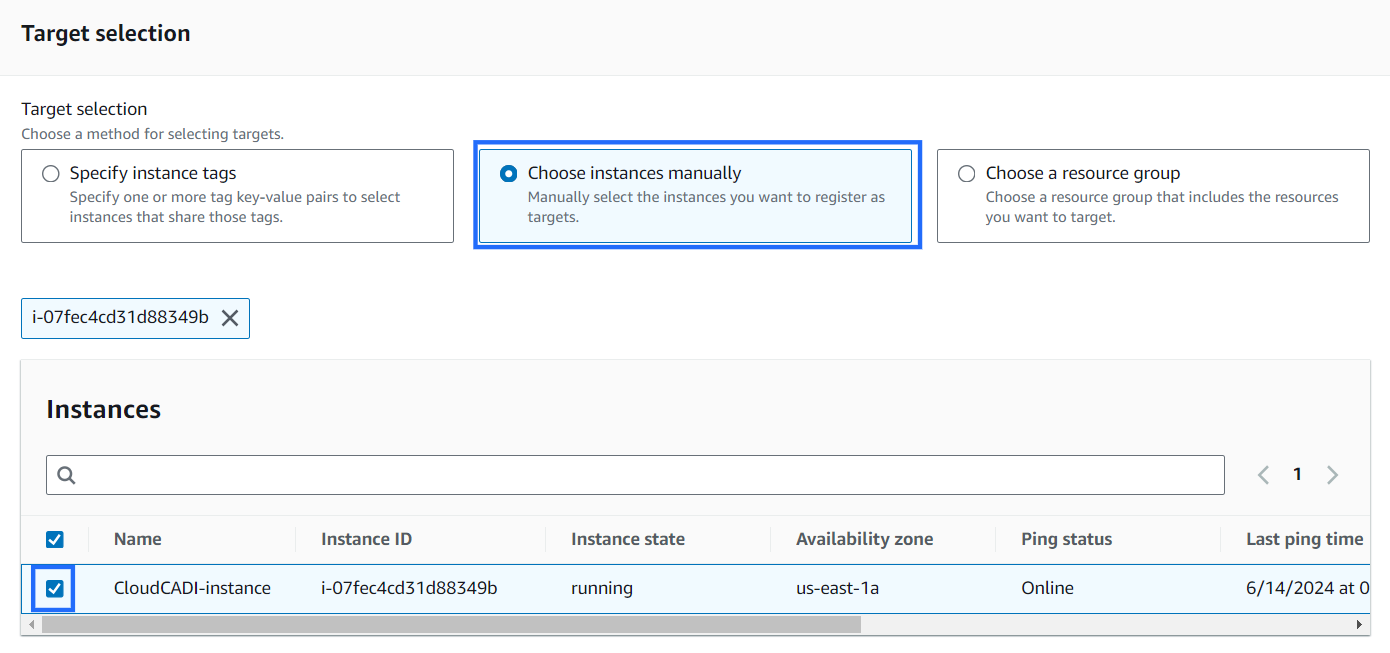
Target selection
- Target selection: Choose instances manually.
- Select the instances where the AmazonCloudWatchAgent to be installed.
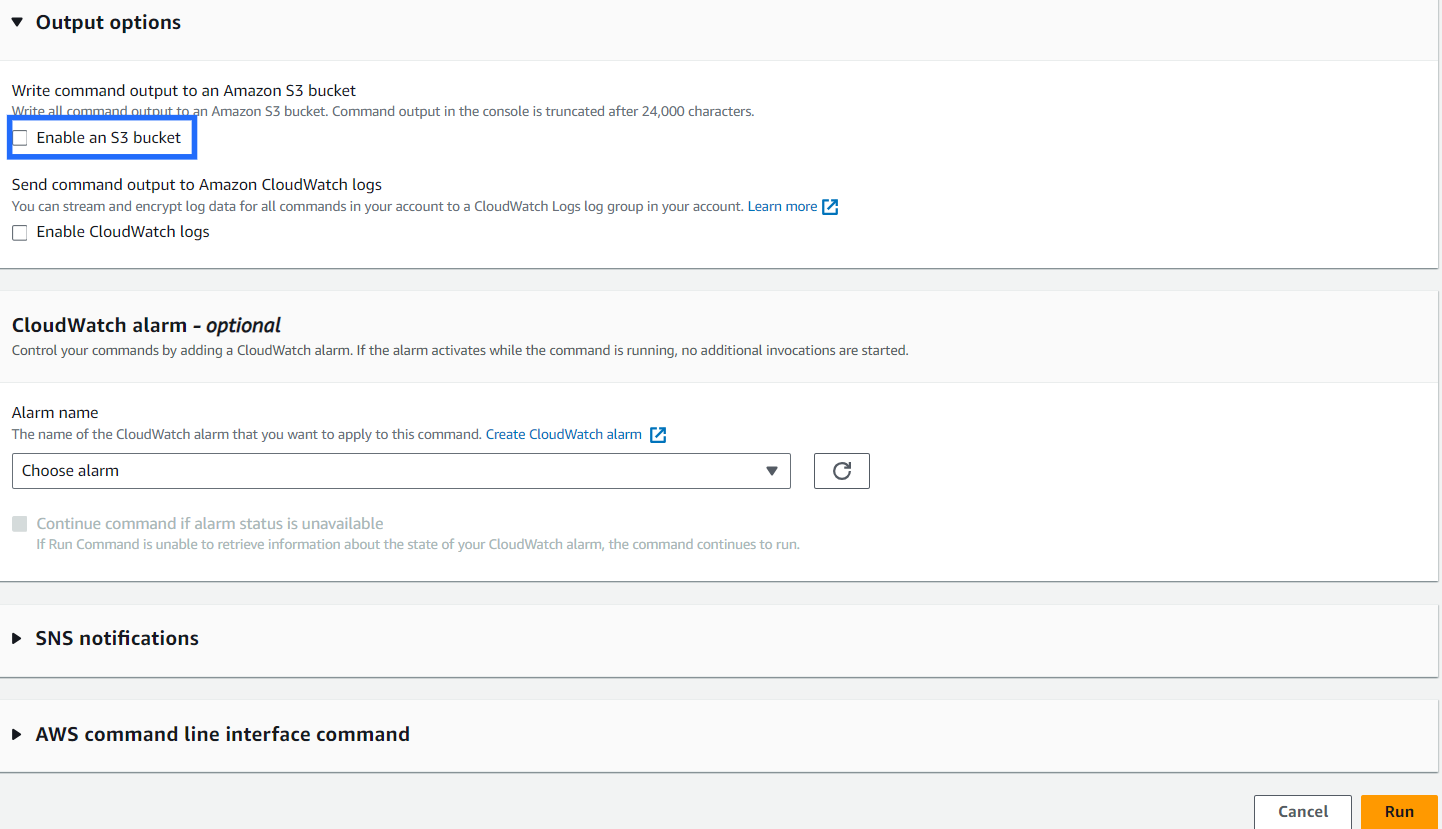
Output options
- Specify the S3 bucket if the command output to be stored if not disable and click Run.
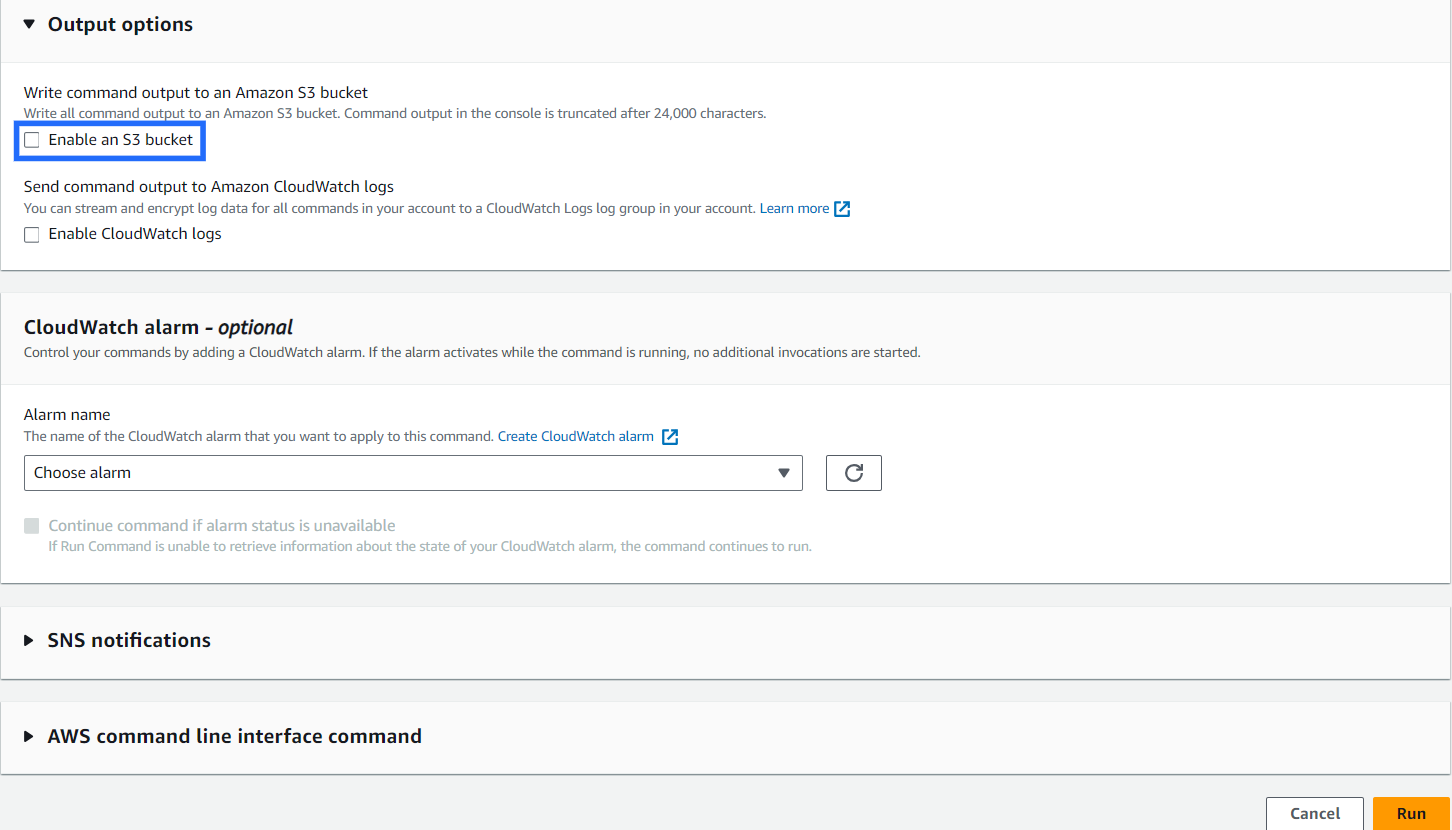
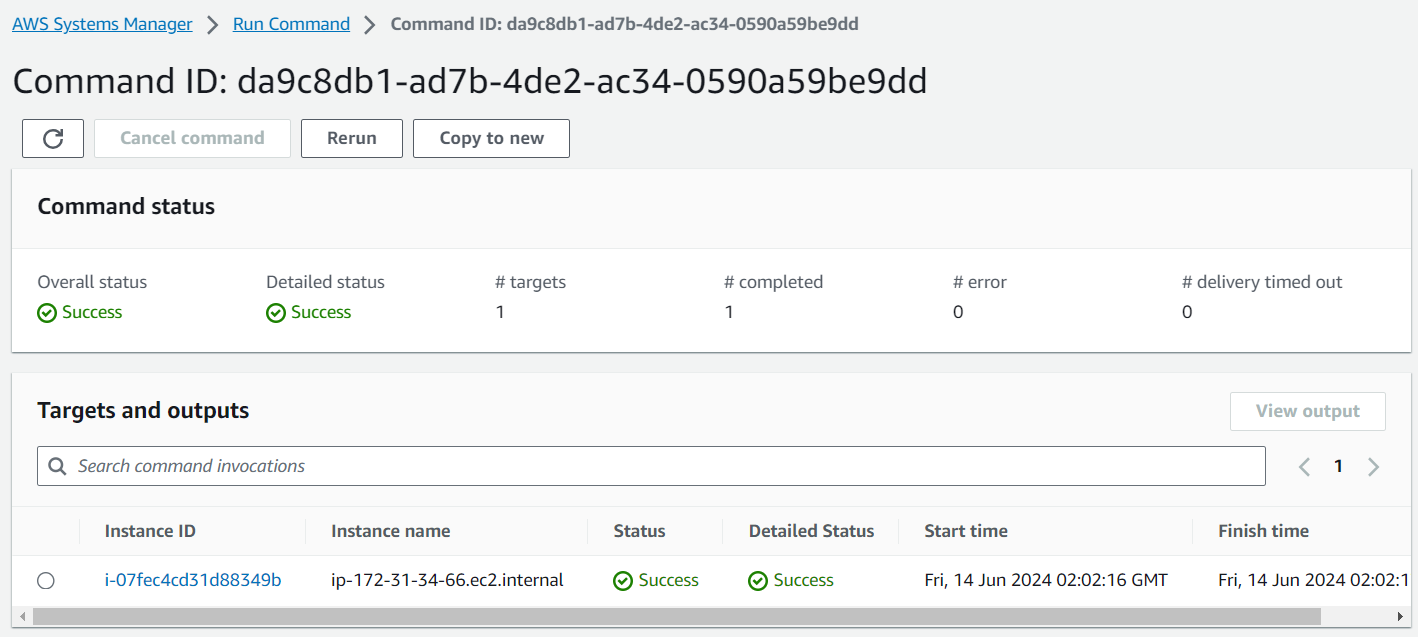
- Check the status of the run. It should be 'Success'.
4.1.6 To Install Configuration for Monitoring Memory Usage.
CloudWatch Agent can send memory usage information every 60 seconds based on metrics_collection_interval.
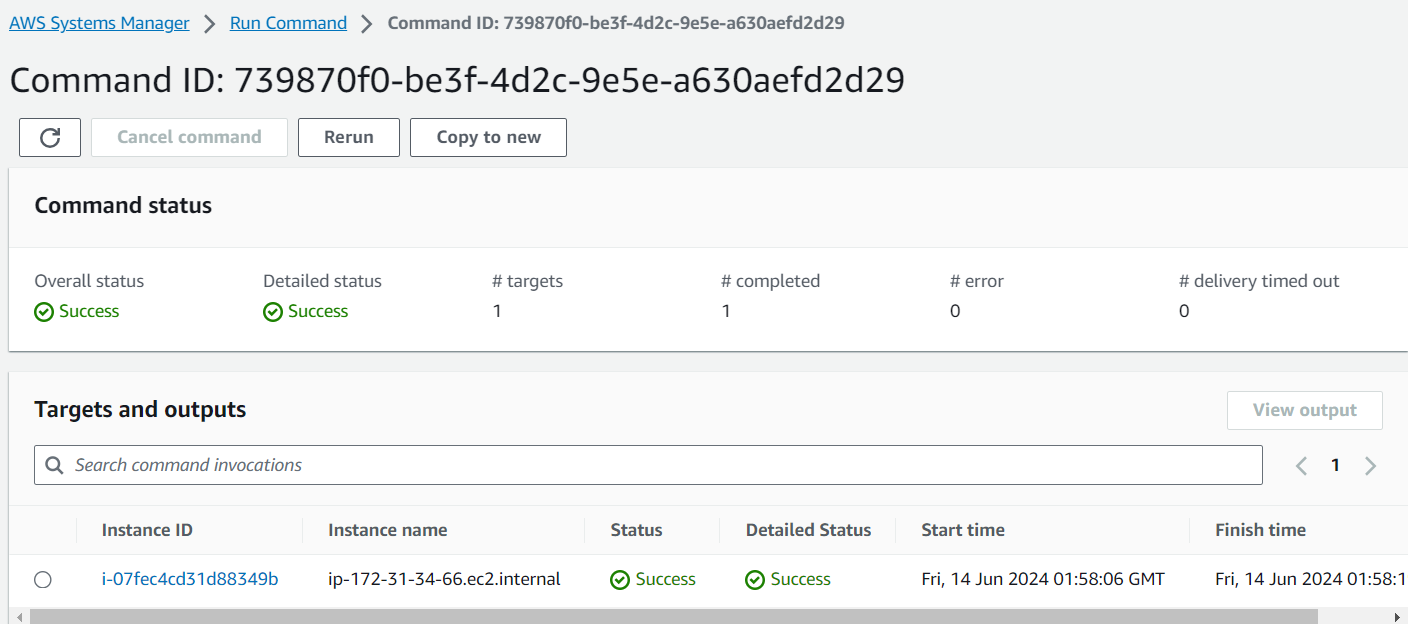
- Go to Systems Manager console -> Run command -> Run a command.
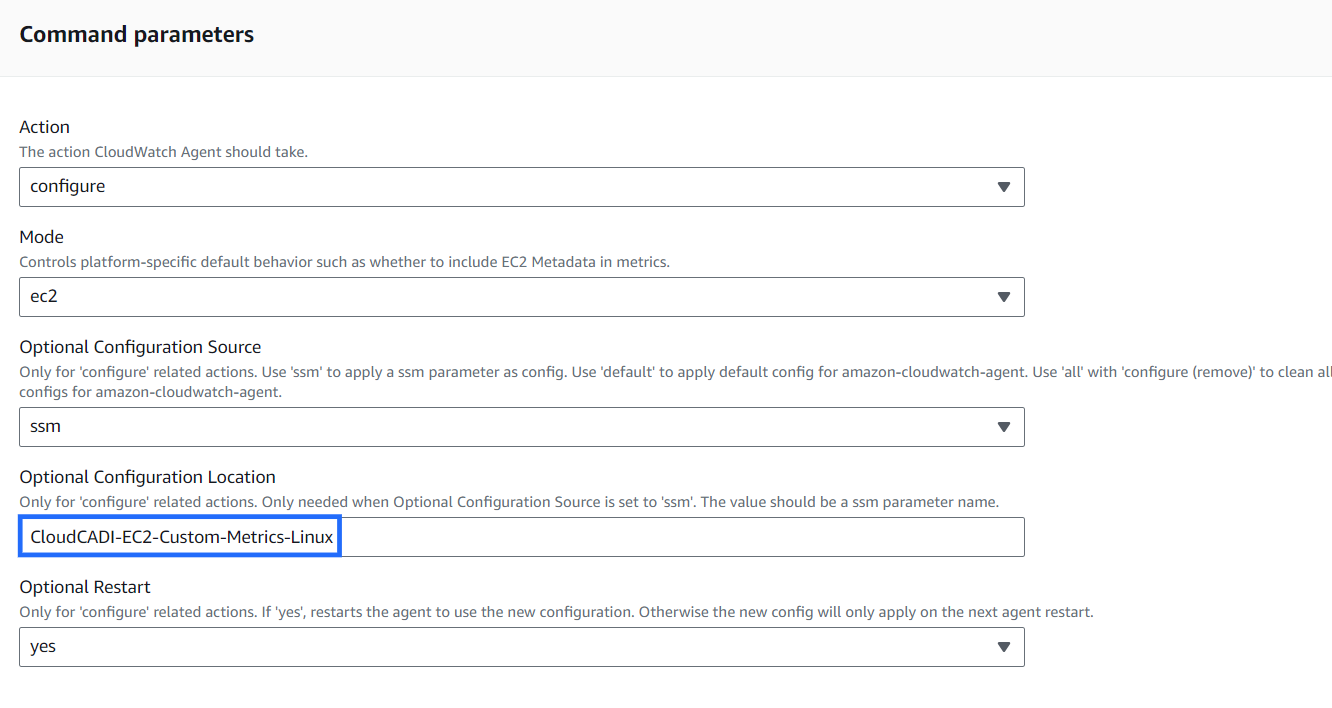
- In Command document Search “AmazonCloudWatch-ManageAgent” from the command list and select.

Command paramters
- Optional Configuration Location: CloudCADI-EC2-Custom-Metrics-Linux (Get the parameter name which was created earlier).
Target selection
- Target selection: Choose instances manually.
- Select the instances where the AmazonCloudWatchAgent to be installed.
Output options
- Specify the S3 bucket if the command output to be stored if not disable and click Run.
- Check the status of the run. It should be 'Success'.
Note
- Follow the above steps from ( 4.1.3 – 4.1.6) to enable custom memory metrics for EC2 for the desired regions.
4.1.7 Check CloudWatch Console
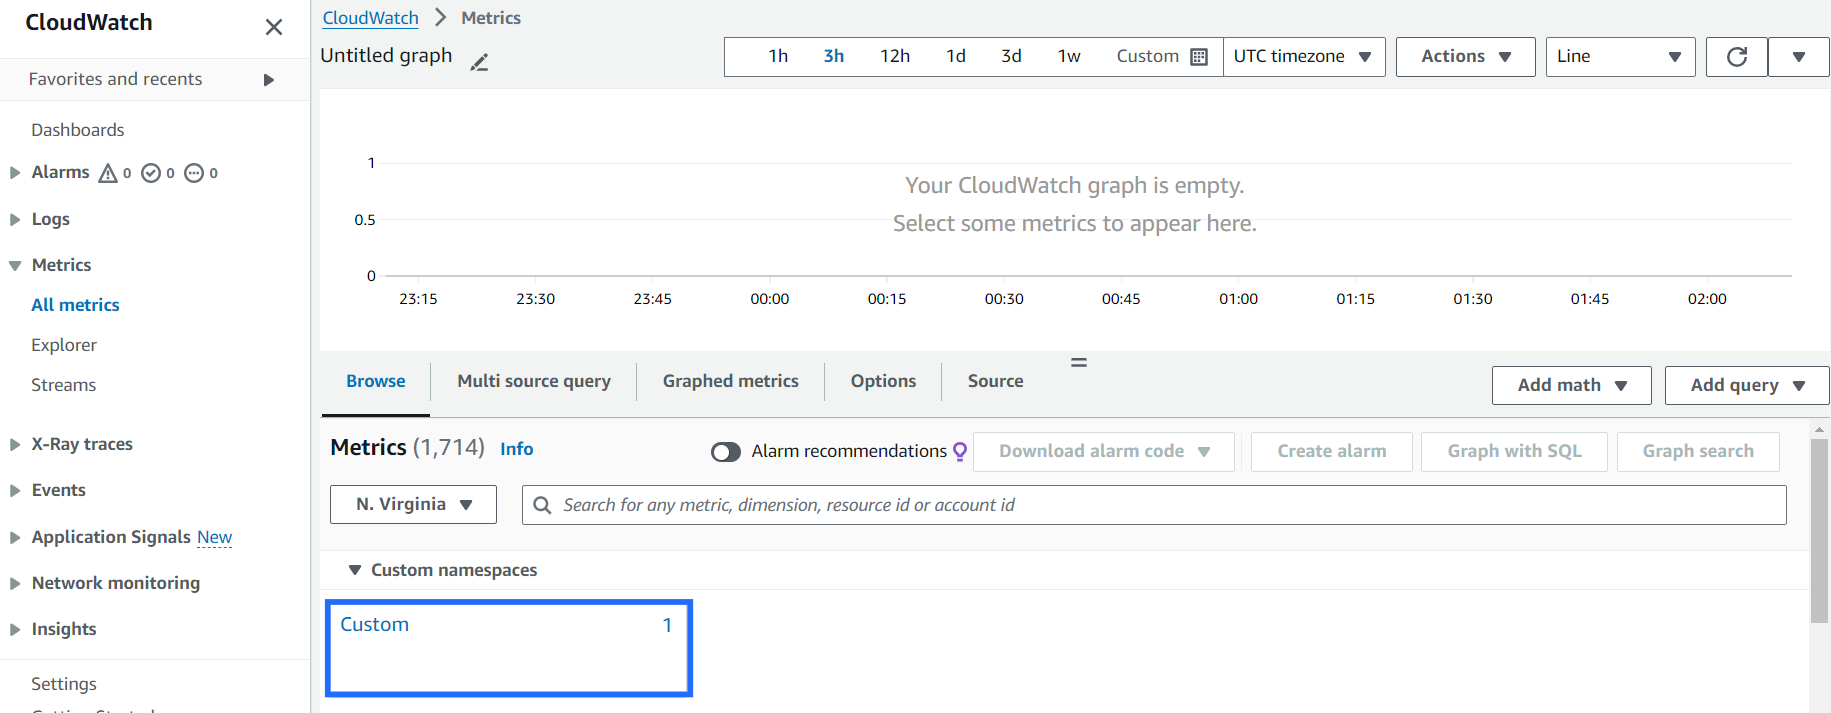
- Go to CloudWatch console -> All metrics
- If everything done correctly then there should be a new Custom namespace in the CloudWatch all metrics and click on Custom.
- Click on InstanceId.
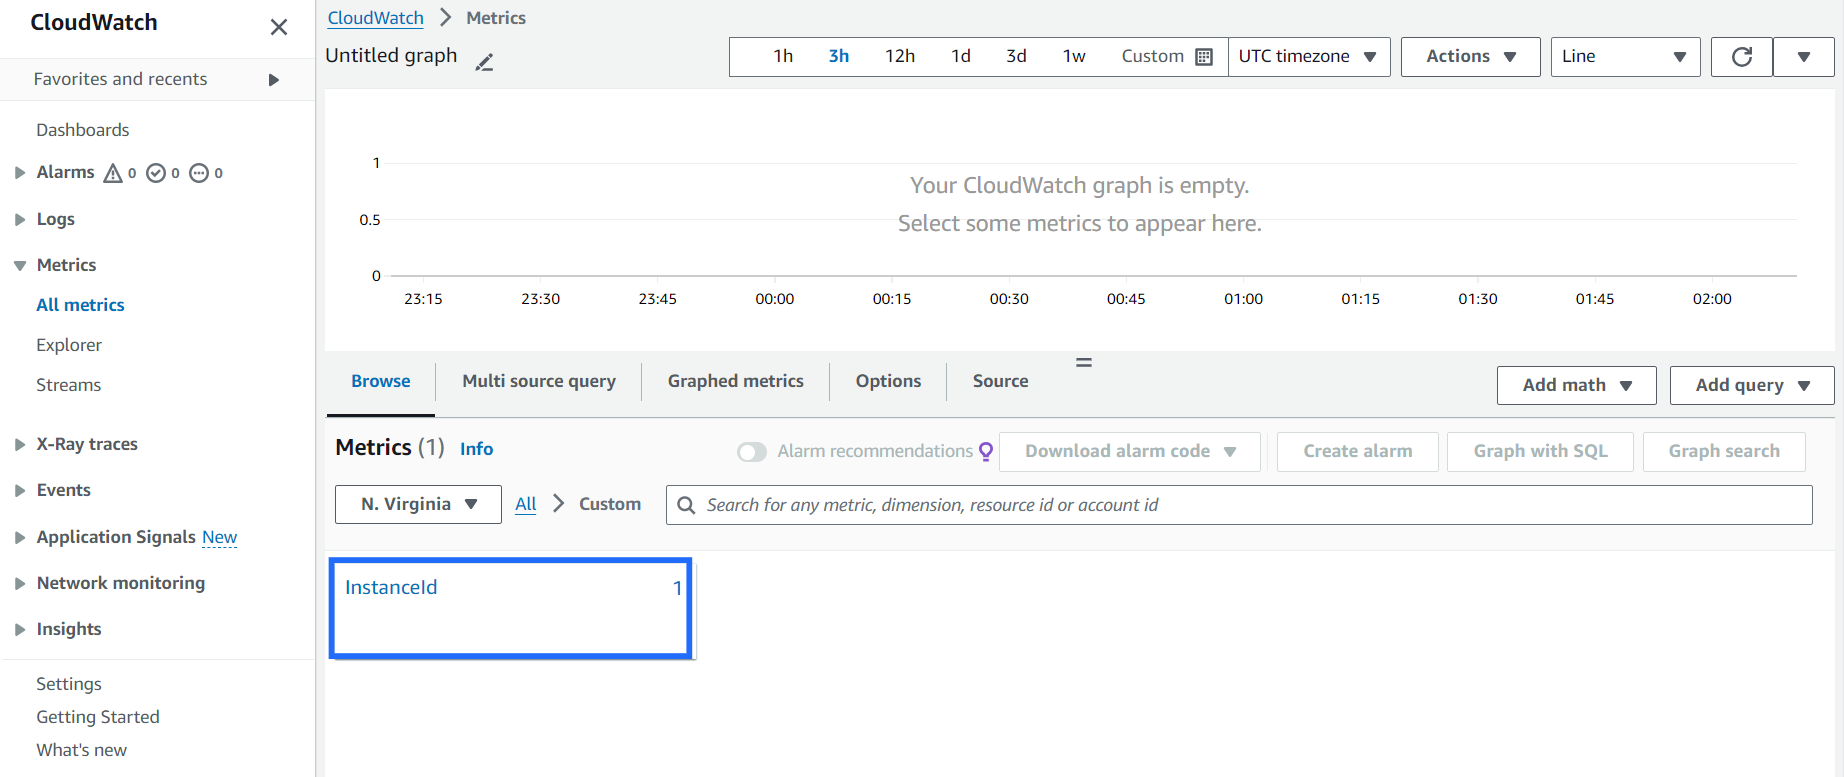
- Select Instance to see the metrics of memory usage.
4.2 ECS
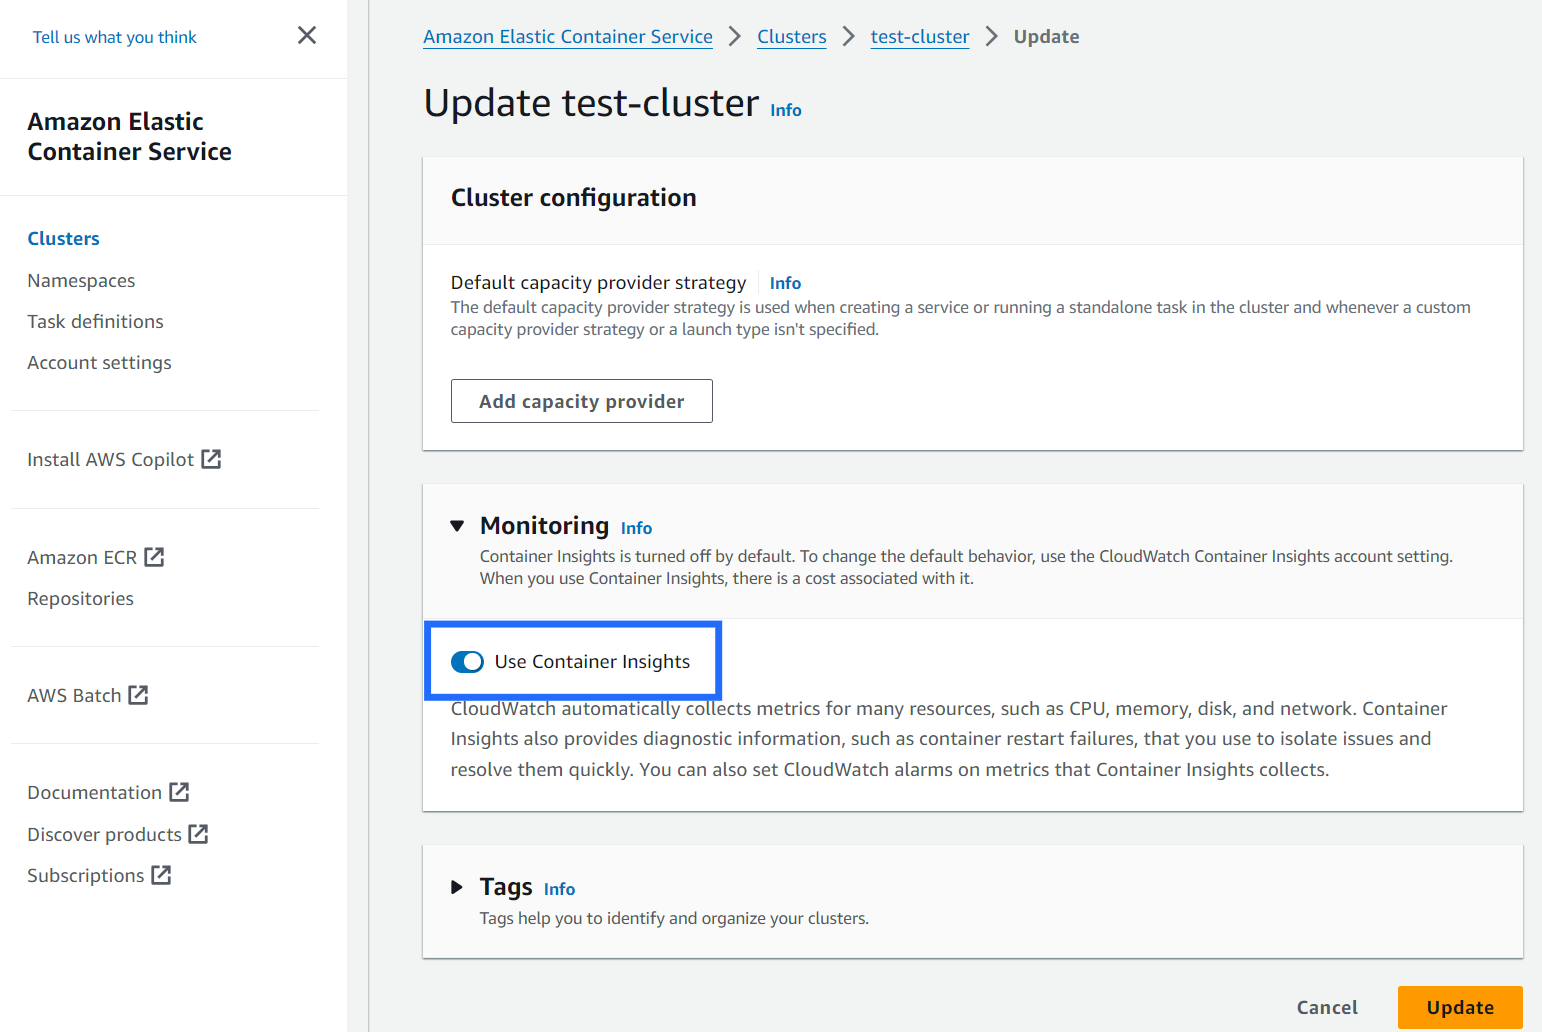
4.2.1 Enable Container Insights
CloudWatch automatically collects metrics for many resources, such as CPU, memory, disk, and network. Container Insights also provides diagnostic information, such as container restart failures, that you use to isolate issues and resolve them quickly.
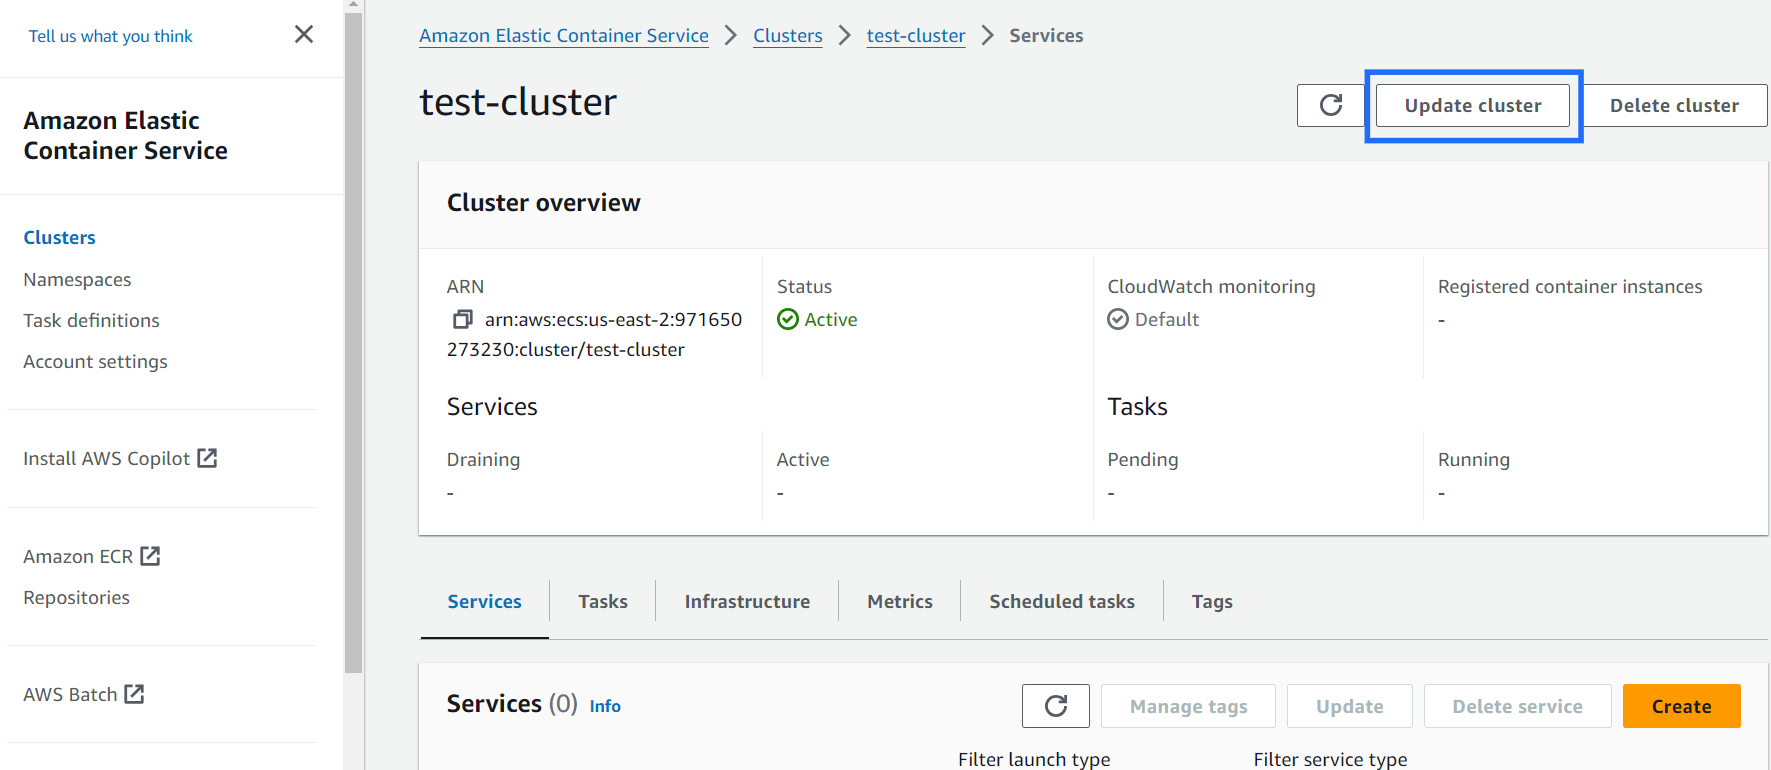
- Go to ECS console -> Clusters.
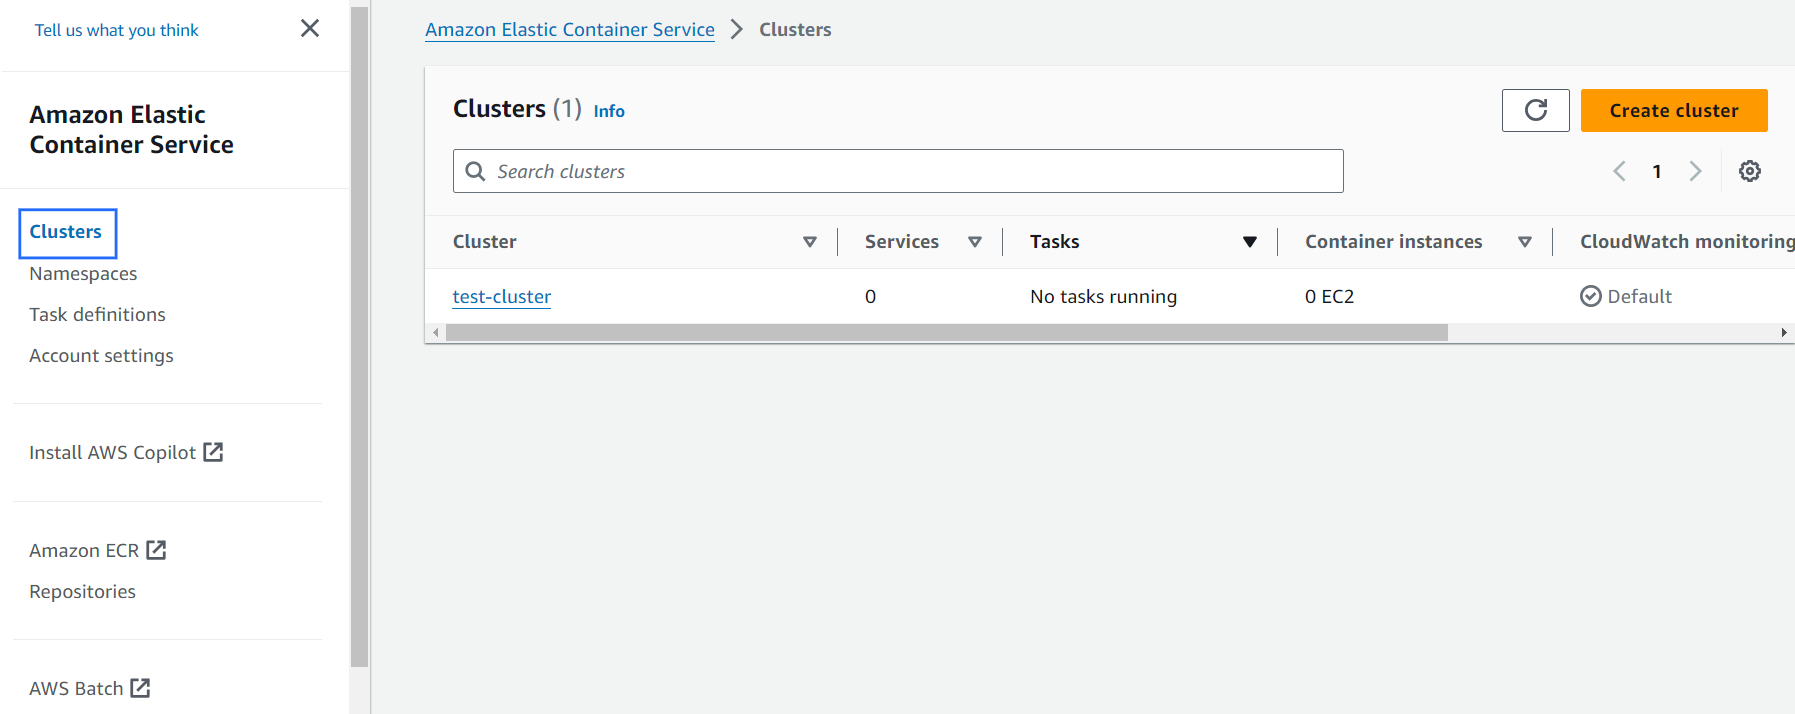
- Choose the cluster name and click Update cluster.
Update test-cluster
- Monitoring: Enable Use Container Insights
- Click Update.
4.2.2 Check CloudWatch Console
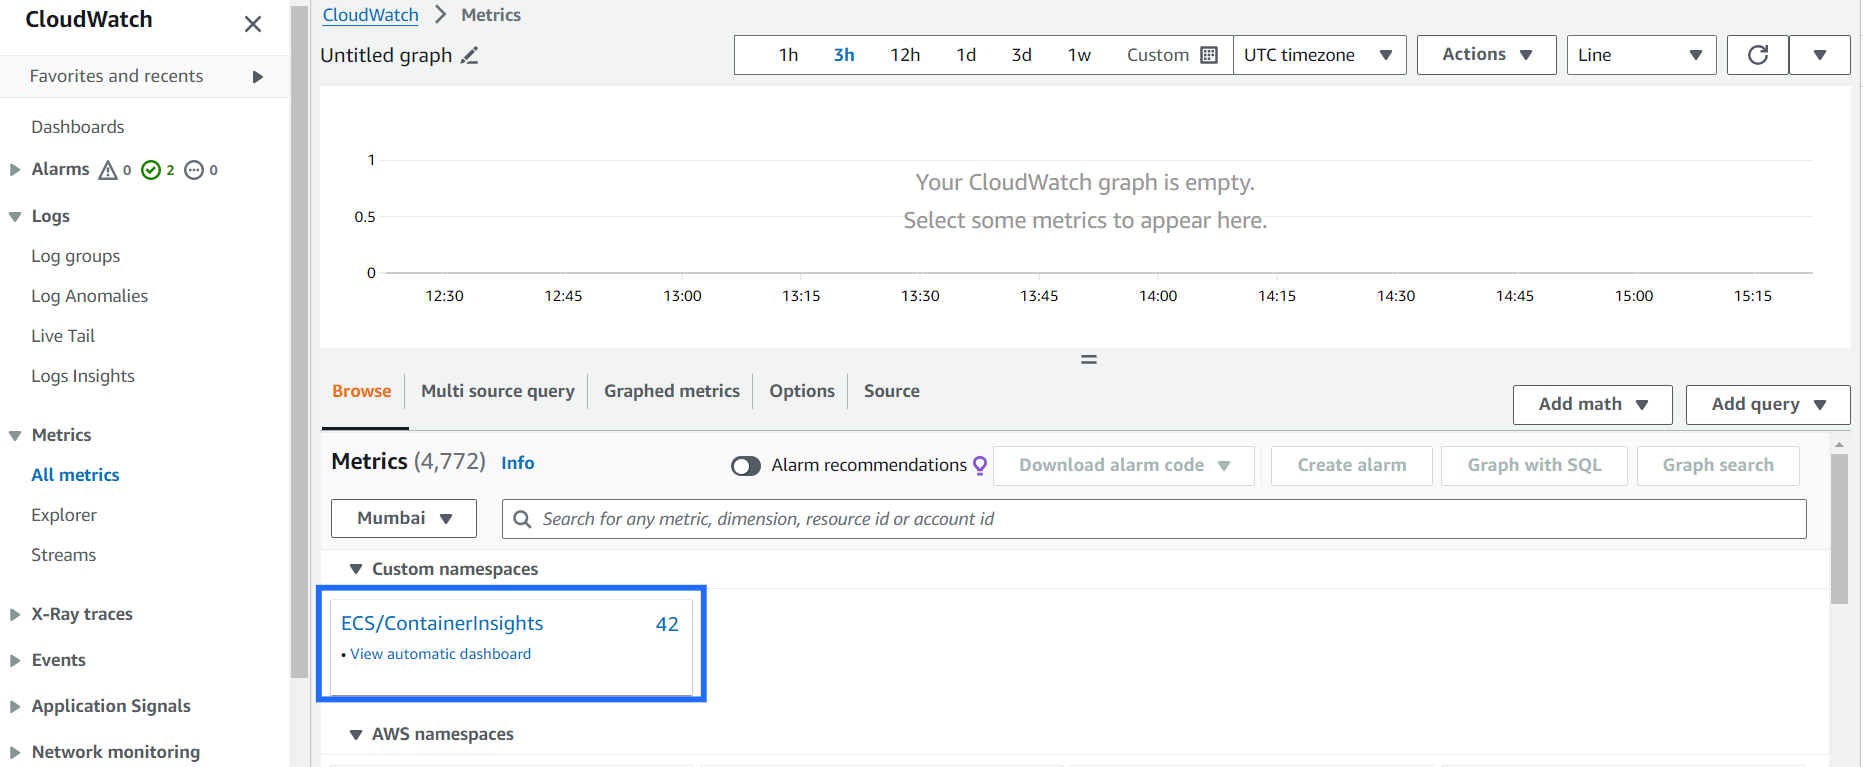
- Go to CloudWatch console -> All metrics.
- There should be a new Custom namespace in the CloudWatch all metrics and click on ECS/ContainerInsights.
- Click on ClusterName, TaskDefinitionFamily.
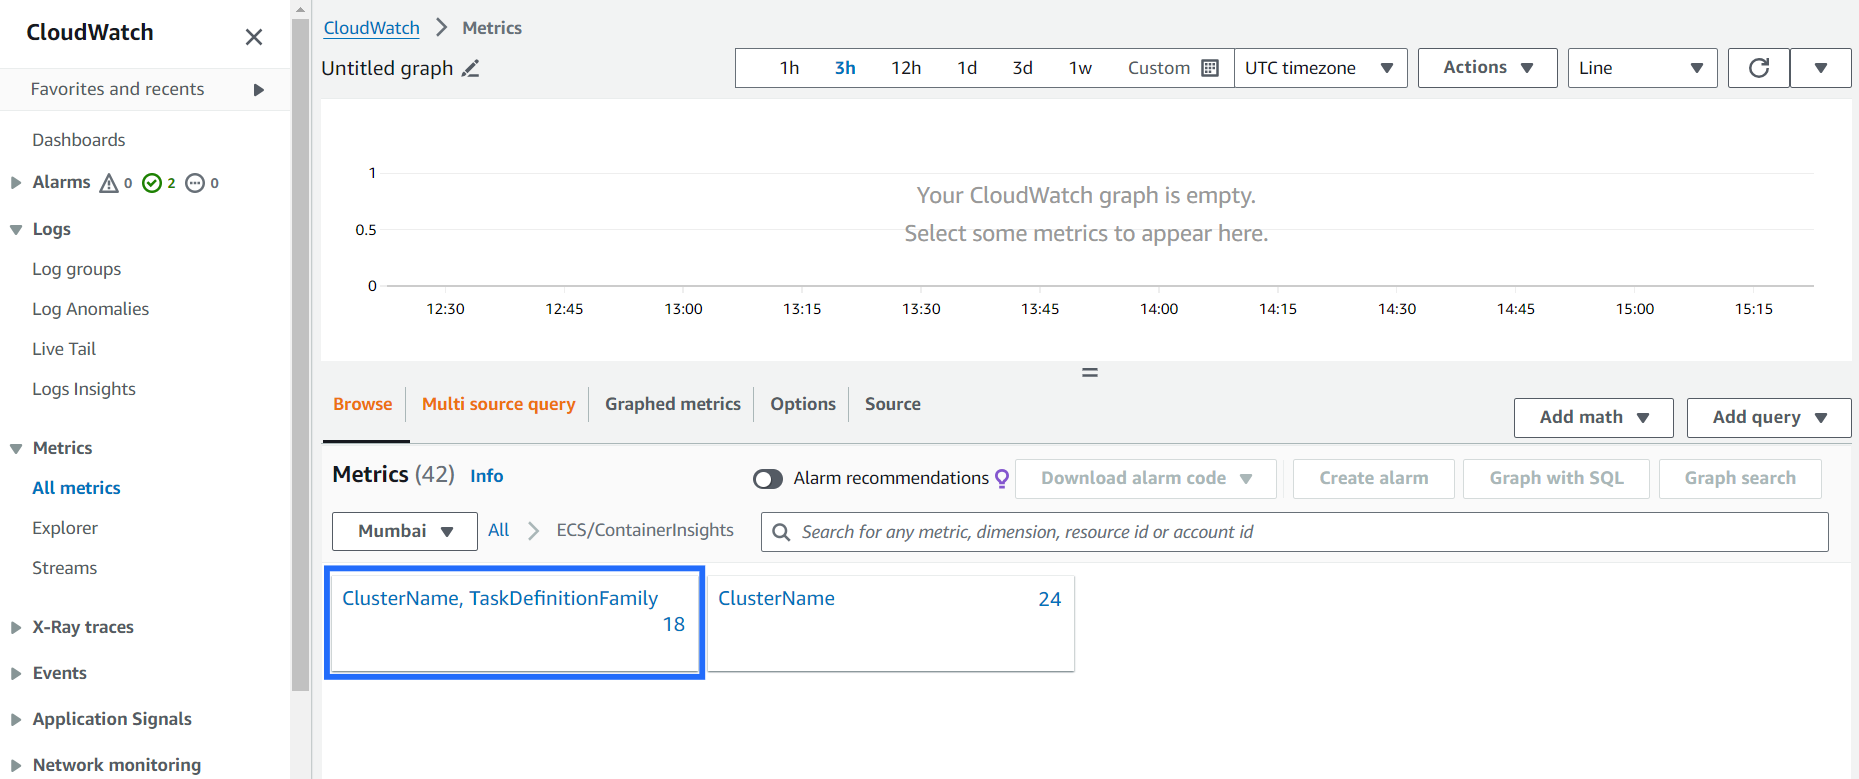
- Select cluster to see the metrics.
4.3 EKS
4.3.1 Enable Container Insights to Get Performance Details
The metrics that Container Insights collects are available in CloudWatch automatic dashboards. You can analyse and troubleshoot container performance and log data with CloudWatch Logs Insights.
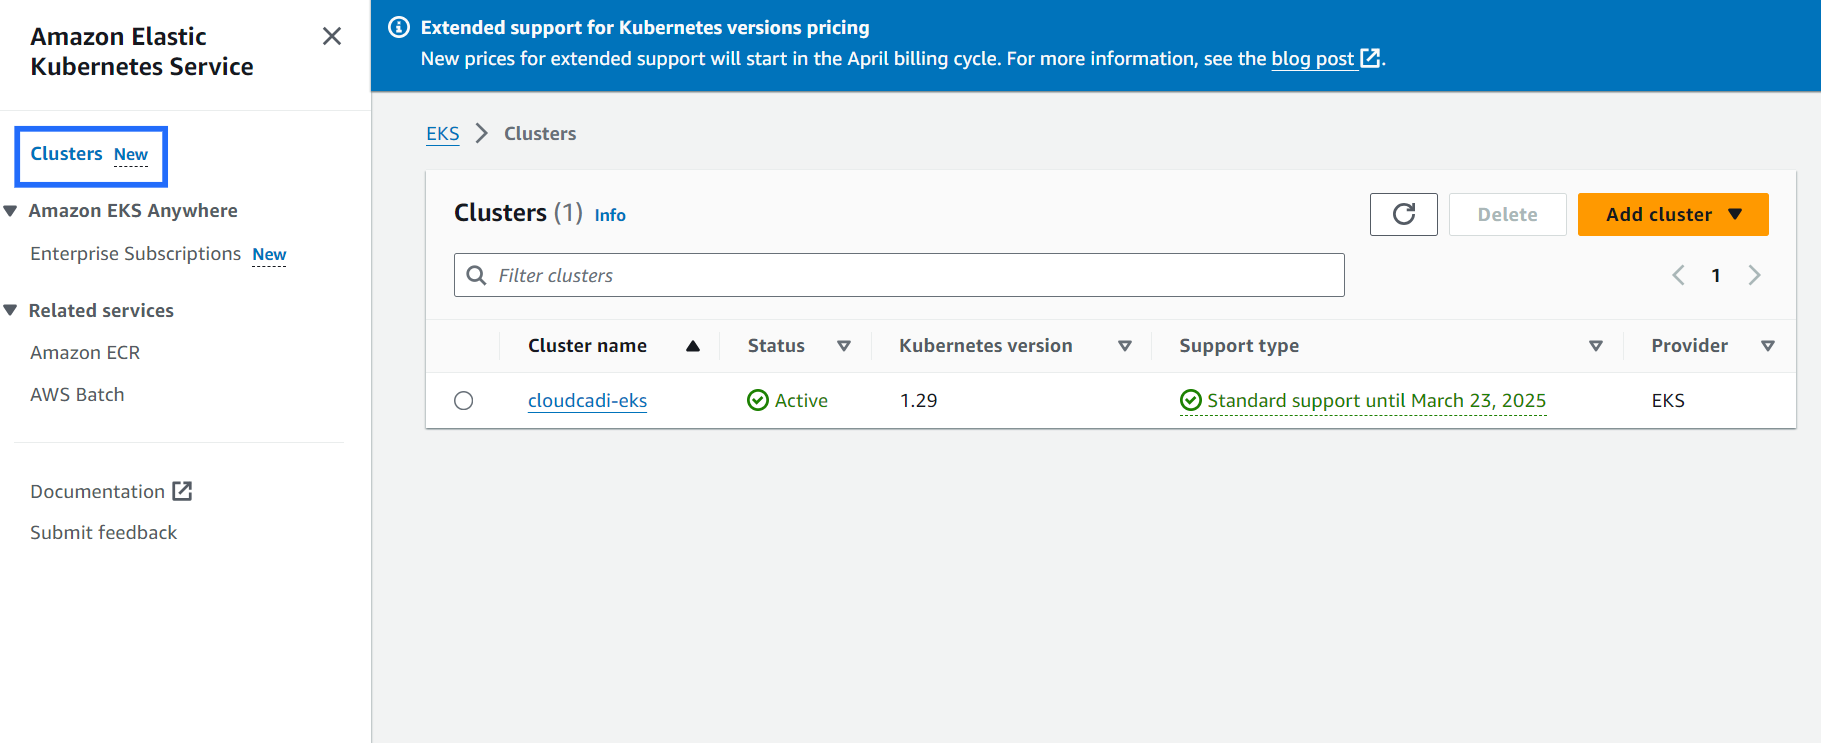
- Go to EKS console -> Clusters.
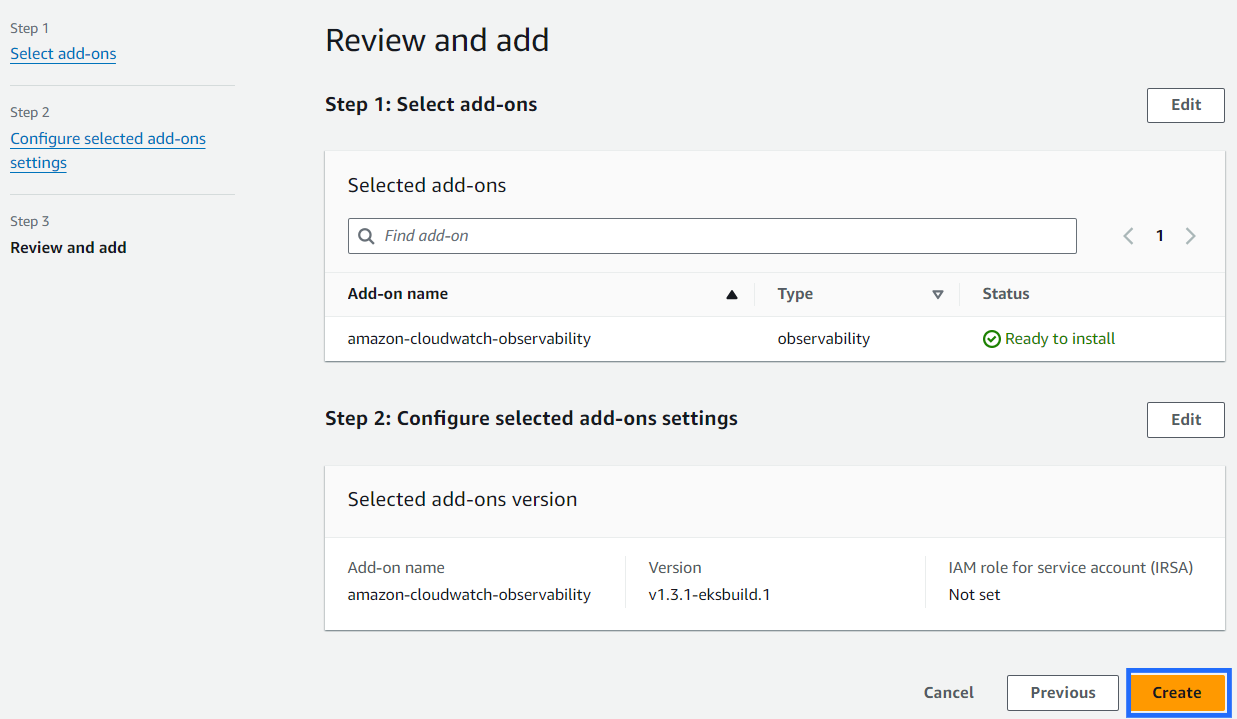
- Click the cluster name and go to Add-ons tab -> Get more add-ons.
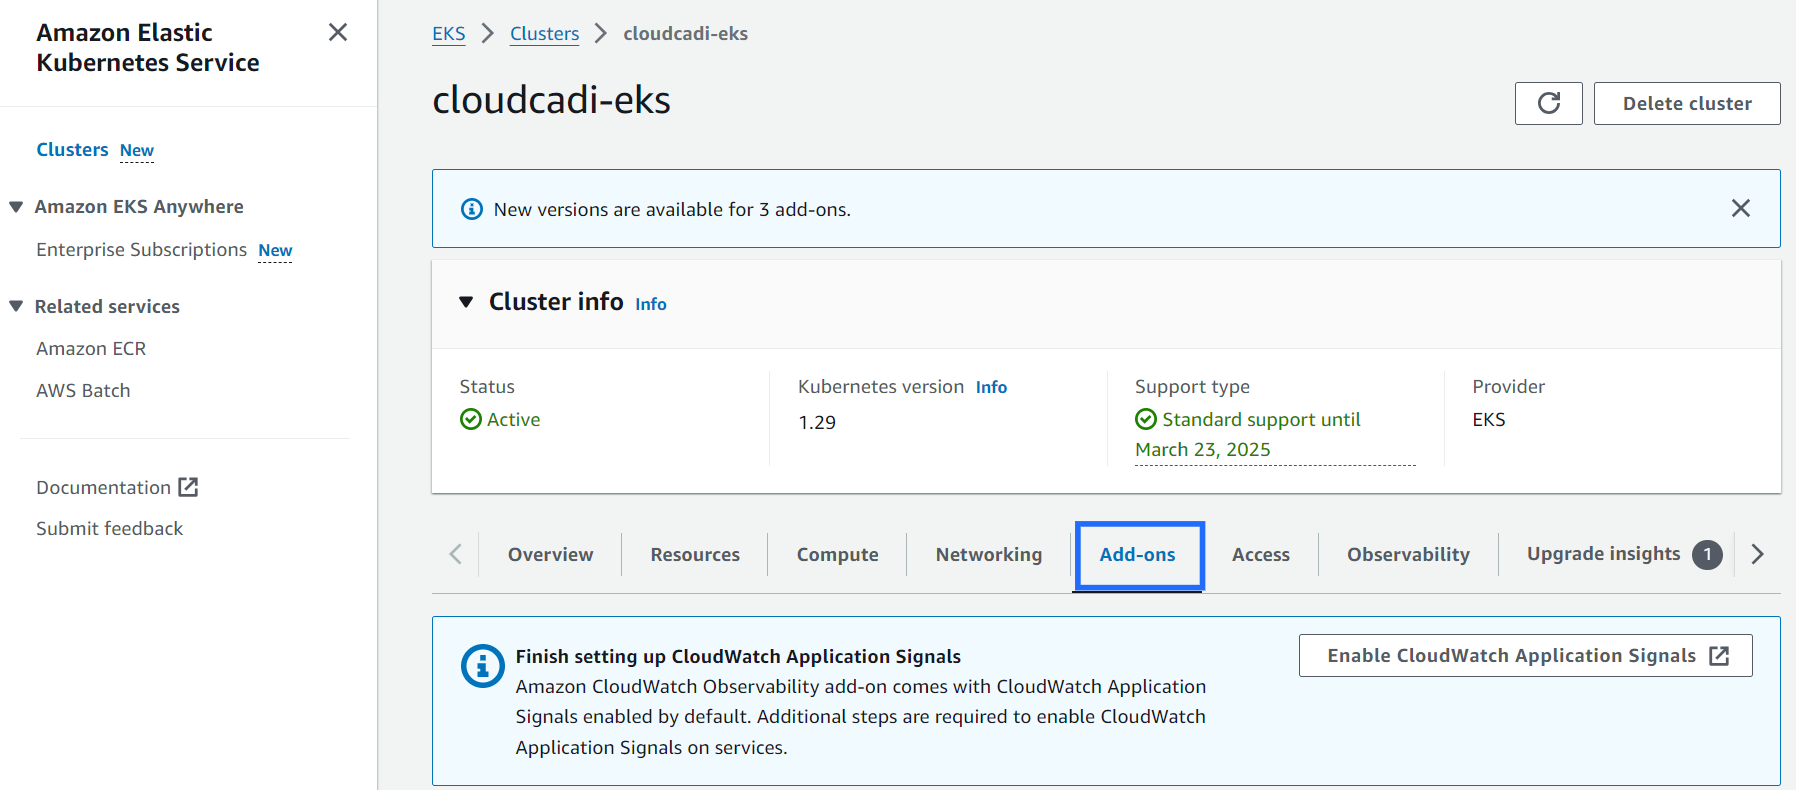
- Choose Amazon CloudWatch Observability and click Next.
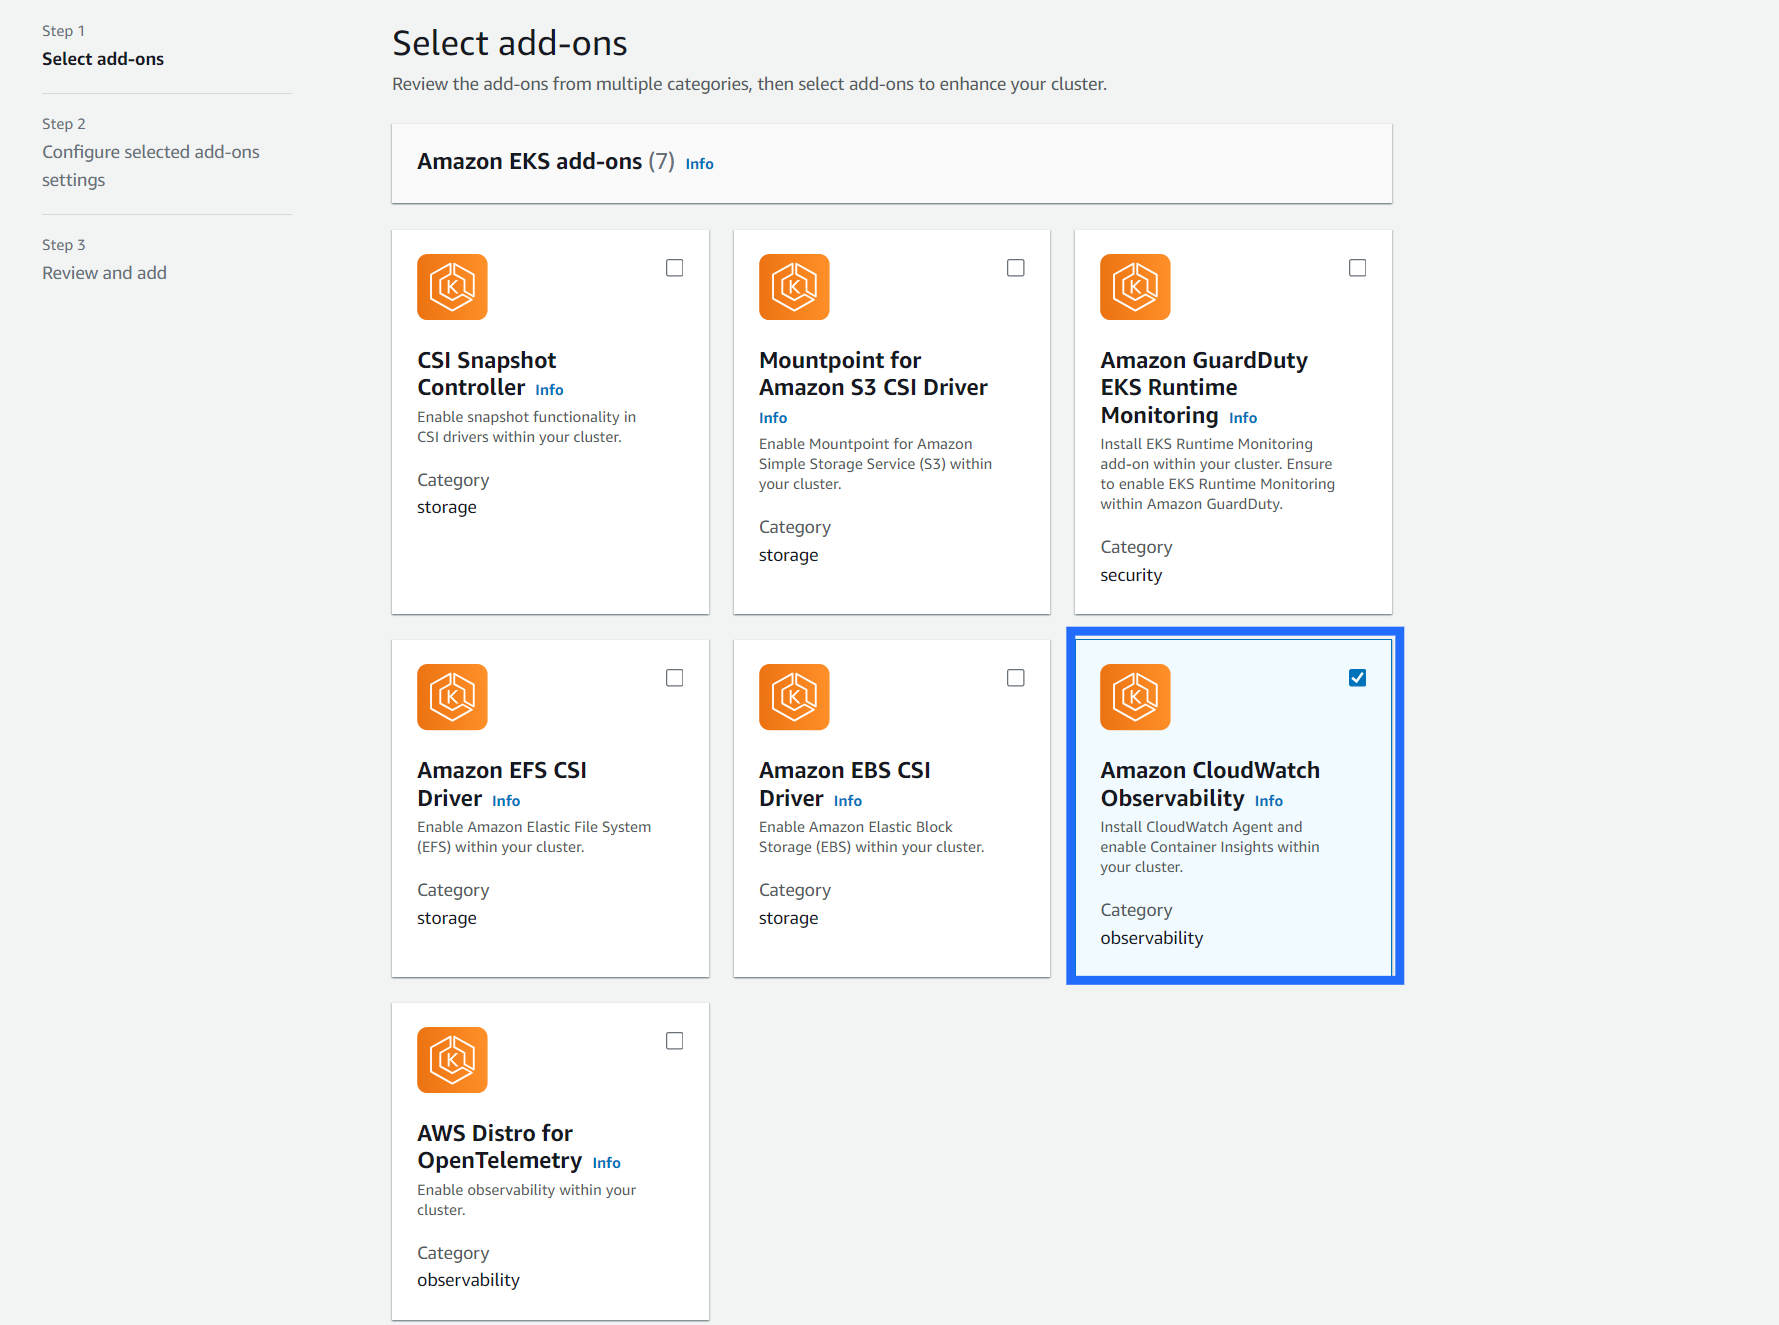
- Click Create.
4.3.2 Enable Log groups to Get Cluster Details.
- Go to EKS console -> Clusters.
- Click the cluster name and go to Observability tab.
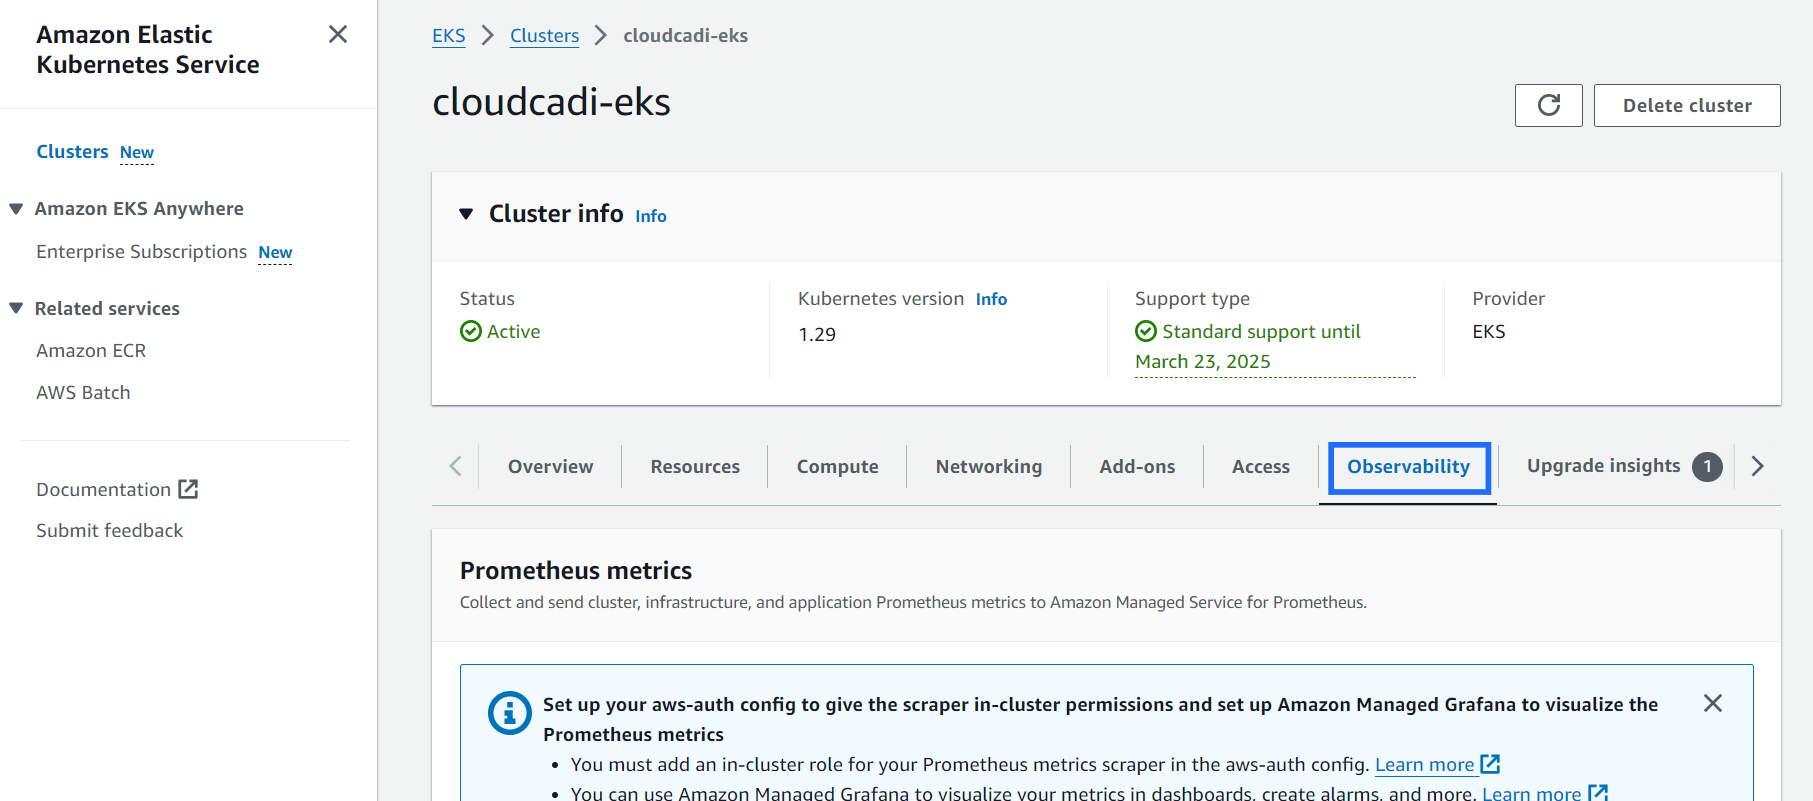
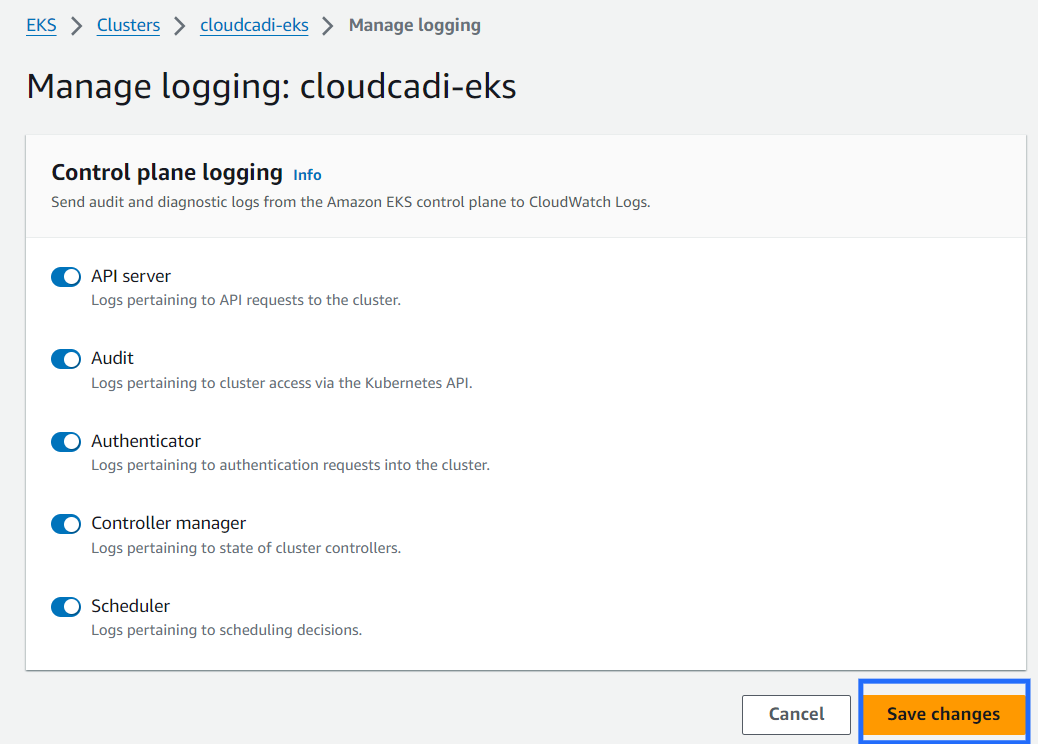
- Scroll down and click Control plane logging -> Manage logging.

- Enable all and click Save changes.
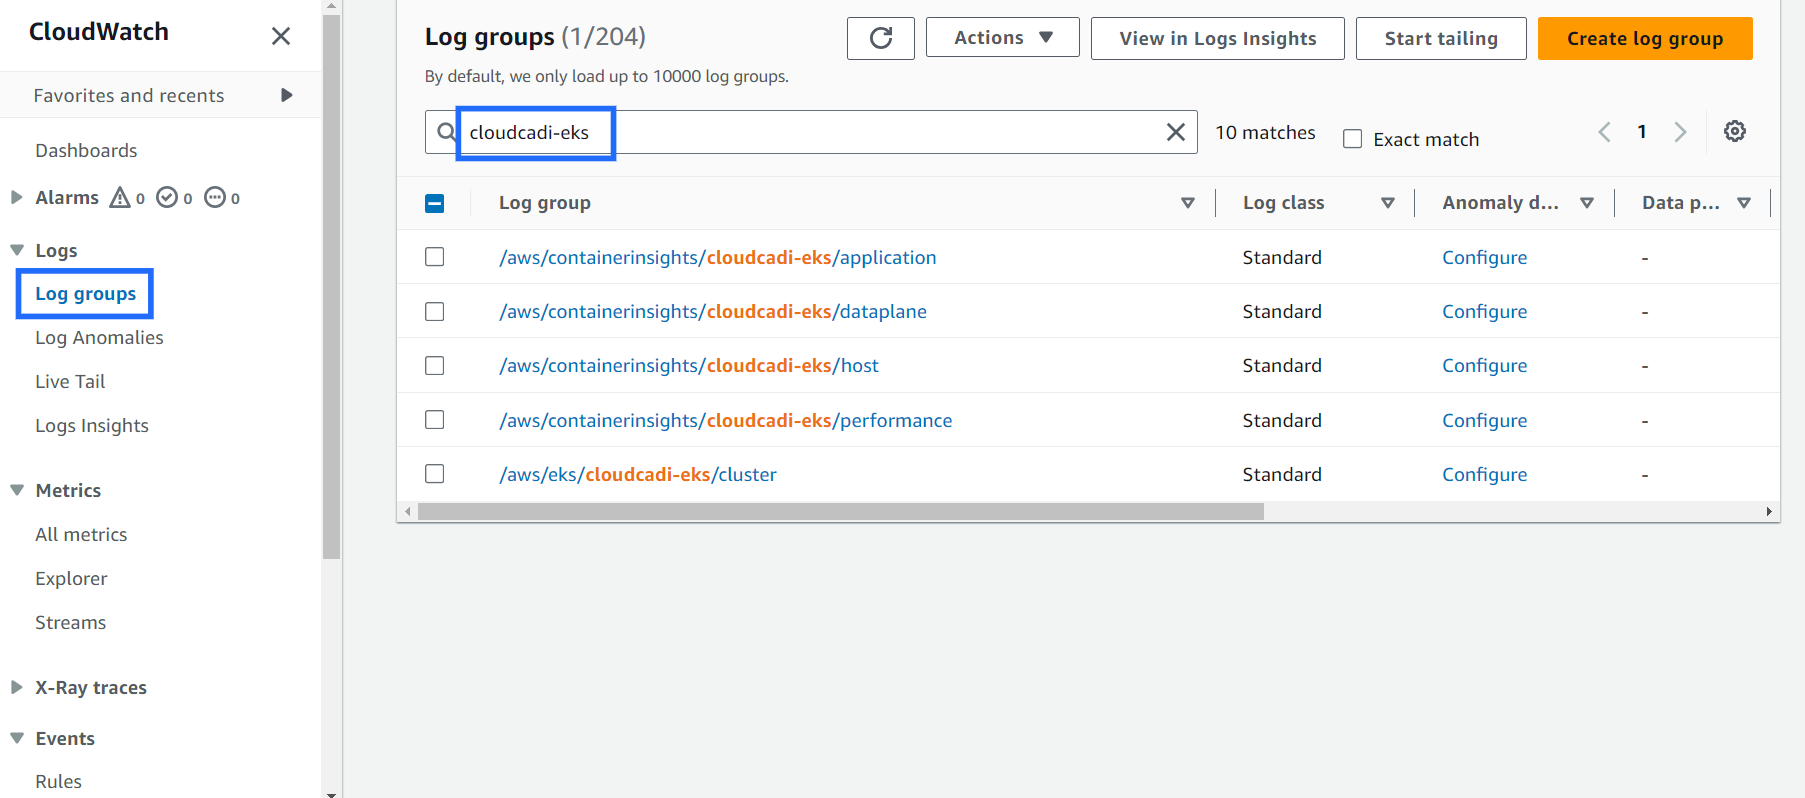
4.3.3 Check CloudWatch Console
- Go to CloudWatch console -> Logs -> Log groups.
- Search for the cluster name to see the log groups and container insights performance metrics.
4.4 Databricks
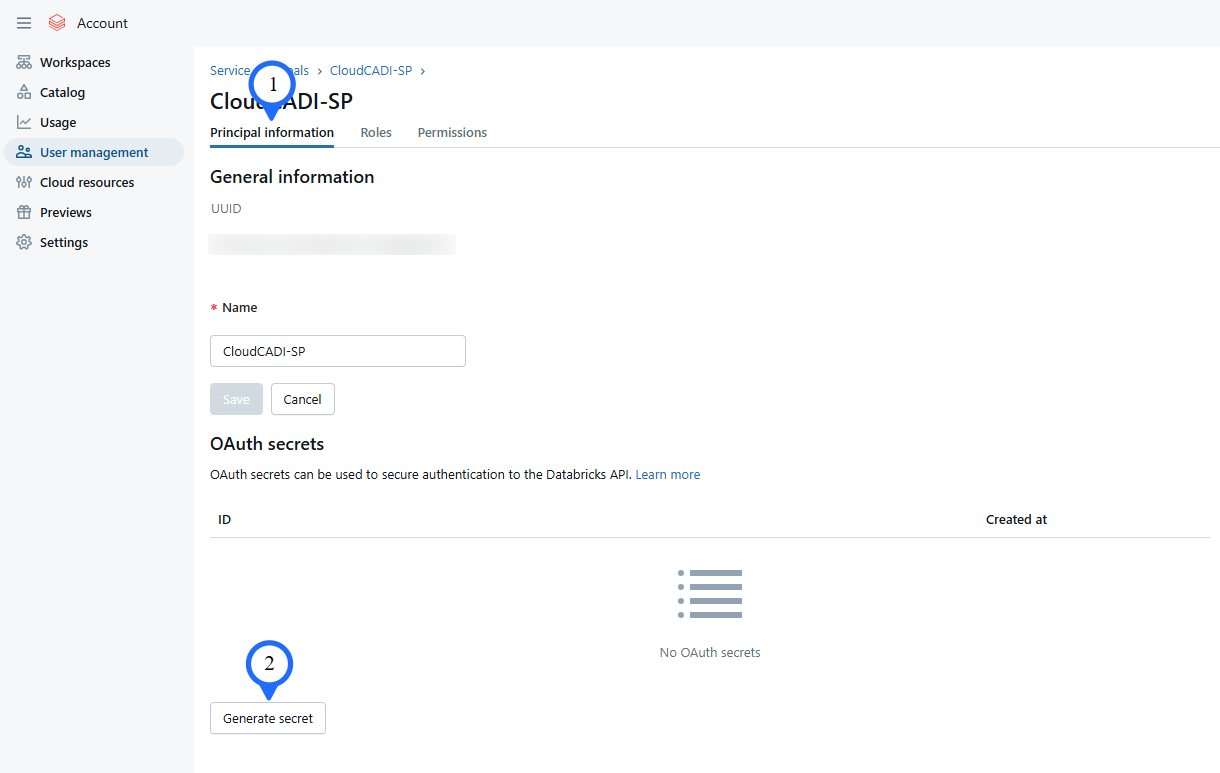
4.4.1 Create Service Principal
-
Service Pricipal with Account admin role is used to access databricks account level APIs. This will help us to create SQL warehouse in the workspace and fetch databricks cost and performance data.
-
Databricks Admin User should login to their Databricks Account.
- Select User Management.
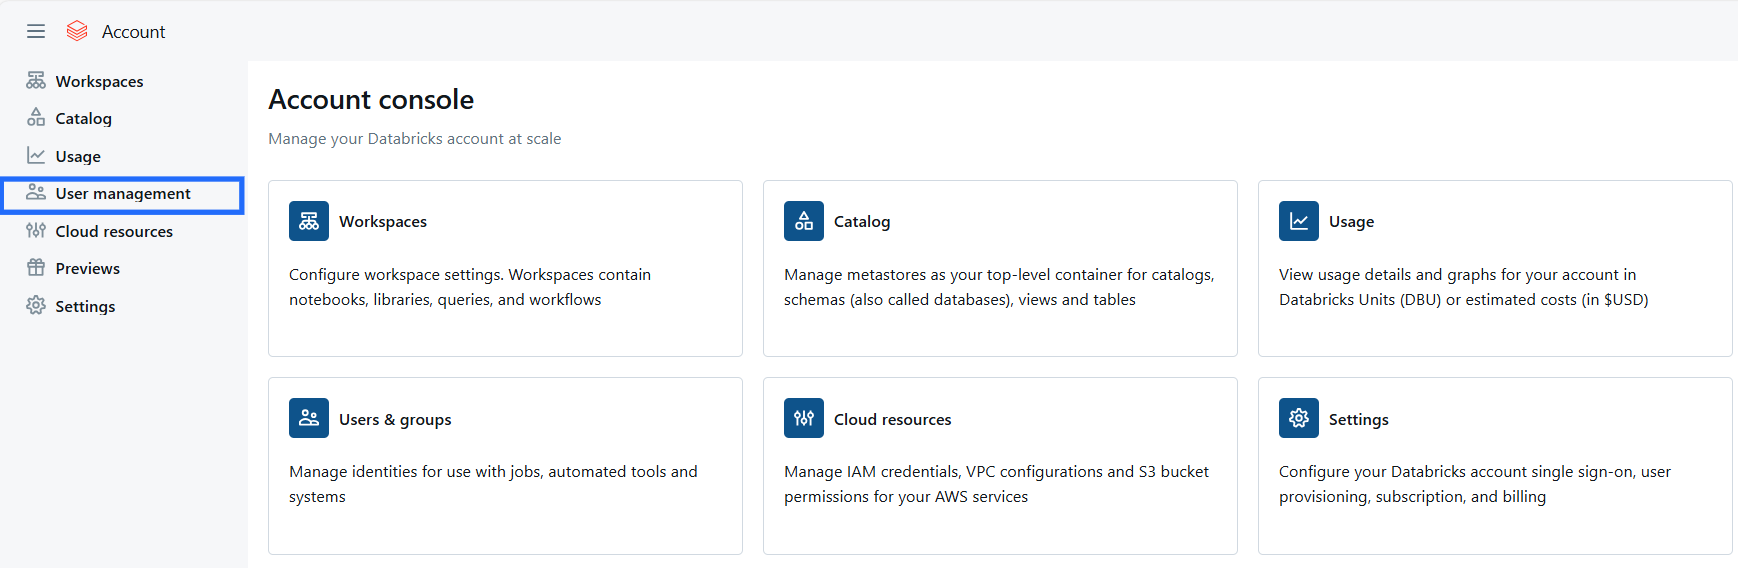
- Select Service Principals.
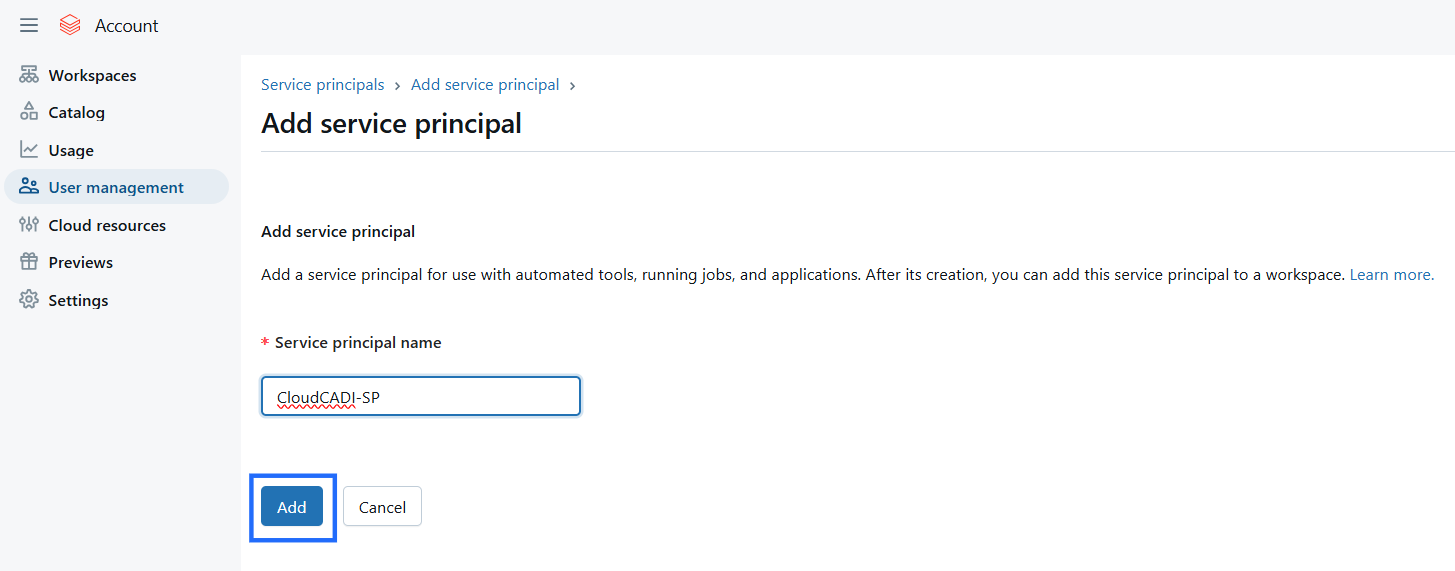
- Either choose existing Service Principal or click Add Service Principal.

- Enter Service Principal Name and click on Add button.
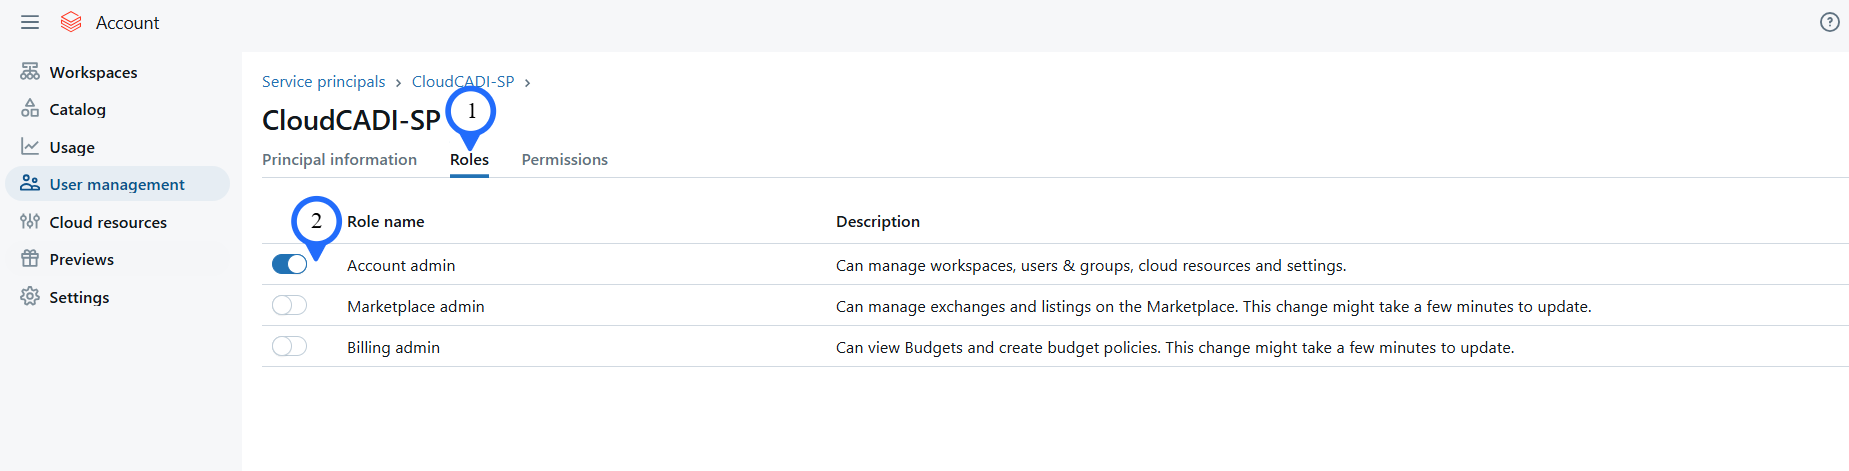
- Click on Roles and enable Account Admin.
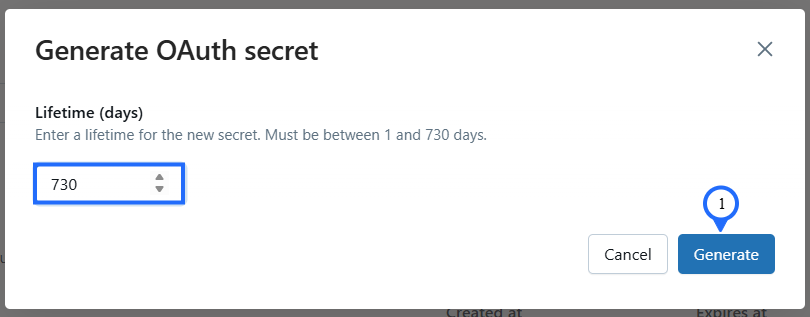
- After this click on Principal Information then click on Generate Secret button.
- Enter 730 and click on Generate.
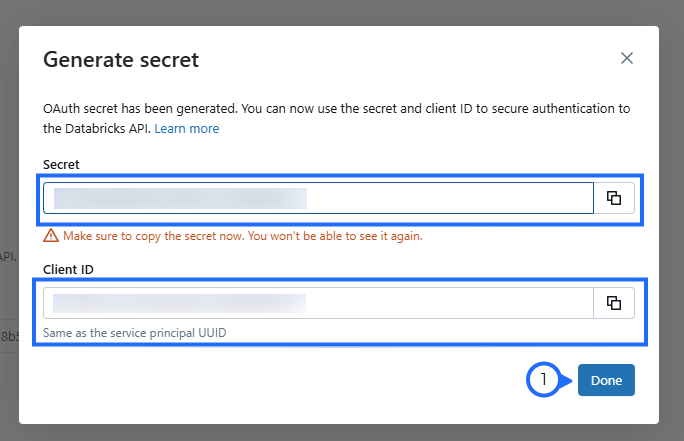
- Copy both Secret and Client ID and click Done.
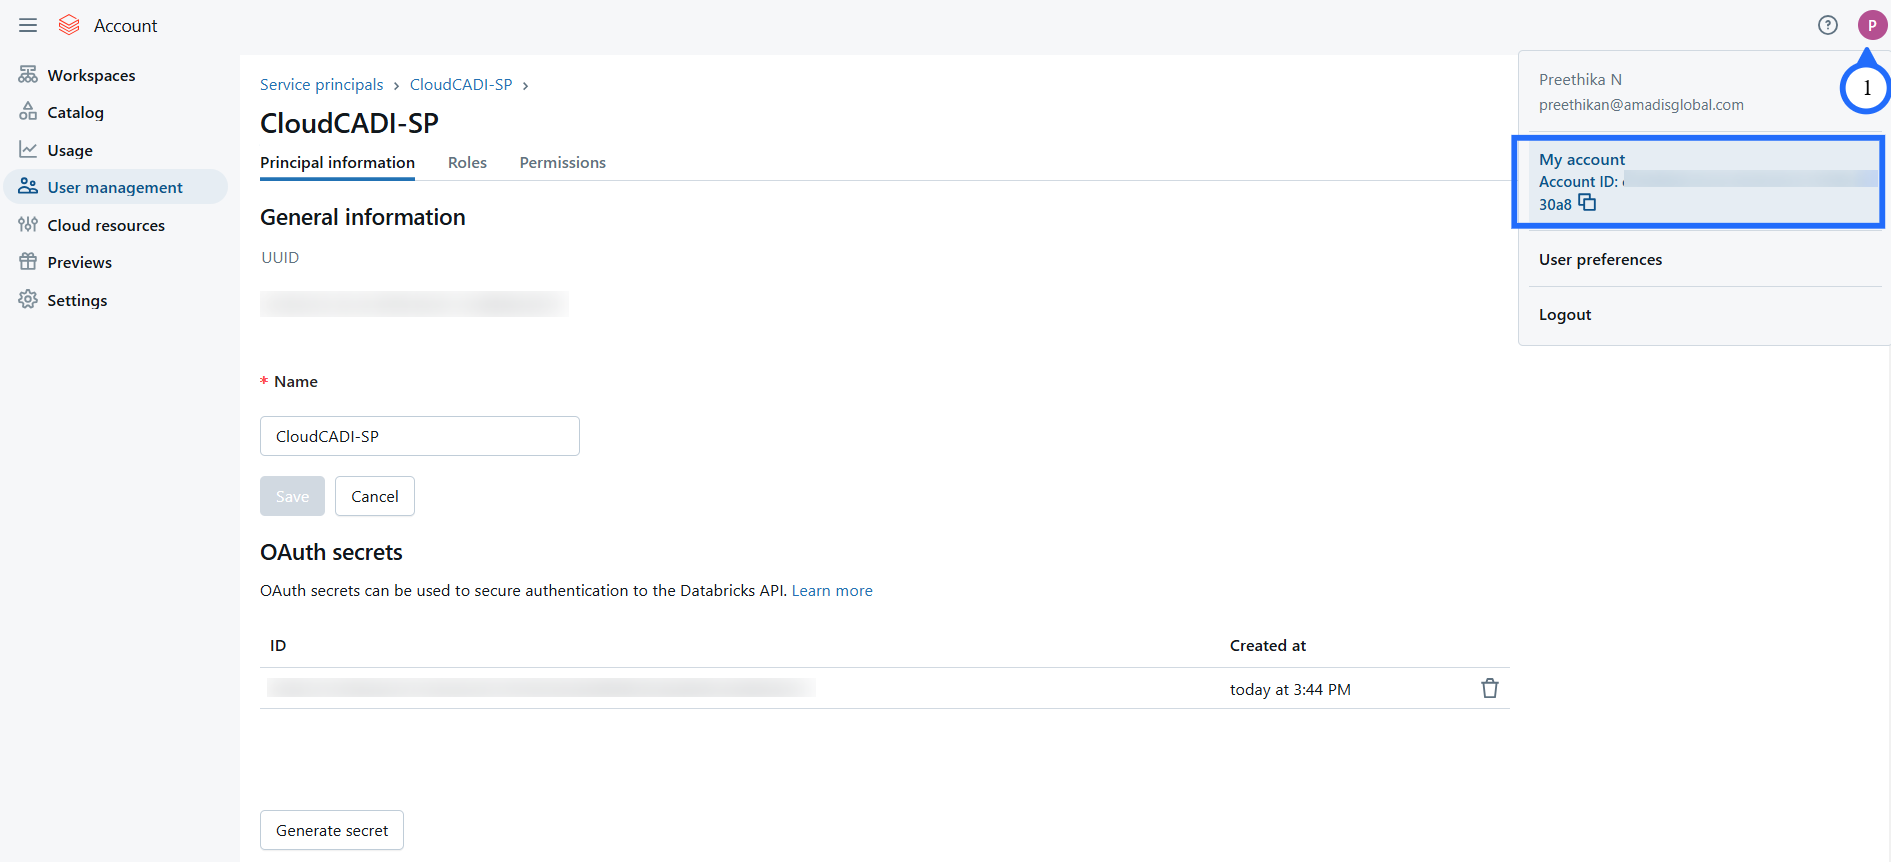
- Go to your profile and copy the Account ID.
4.4.2 System Schema Permission
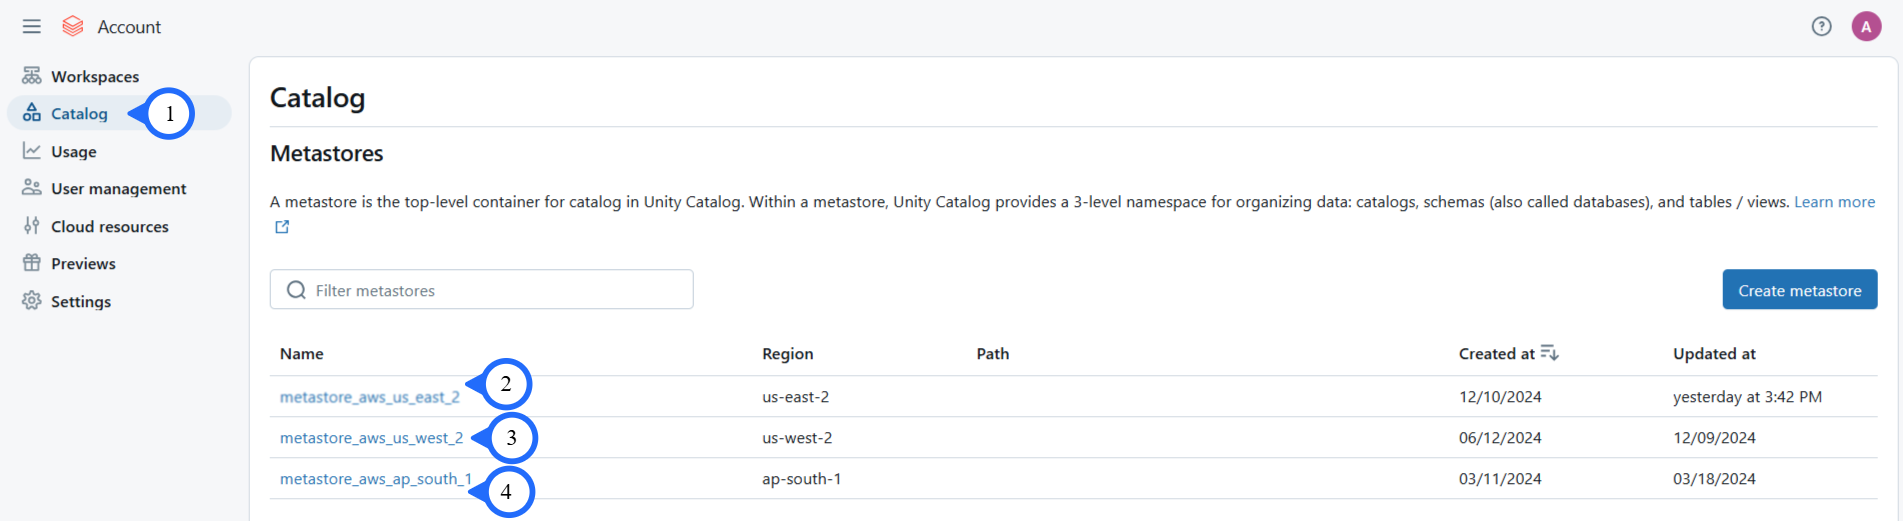
- Click on Catalog, then click the mestores.
- Click on Workspaces, then click open for any one workspace associated with metastore.

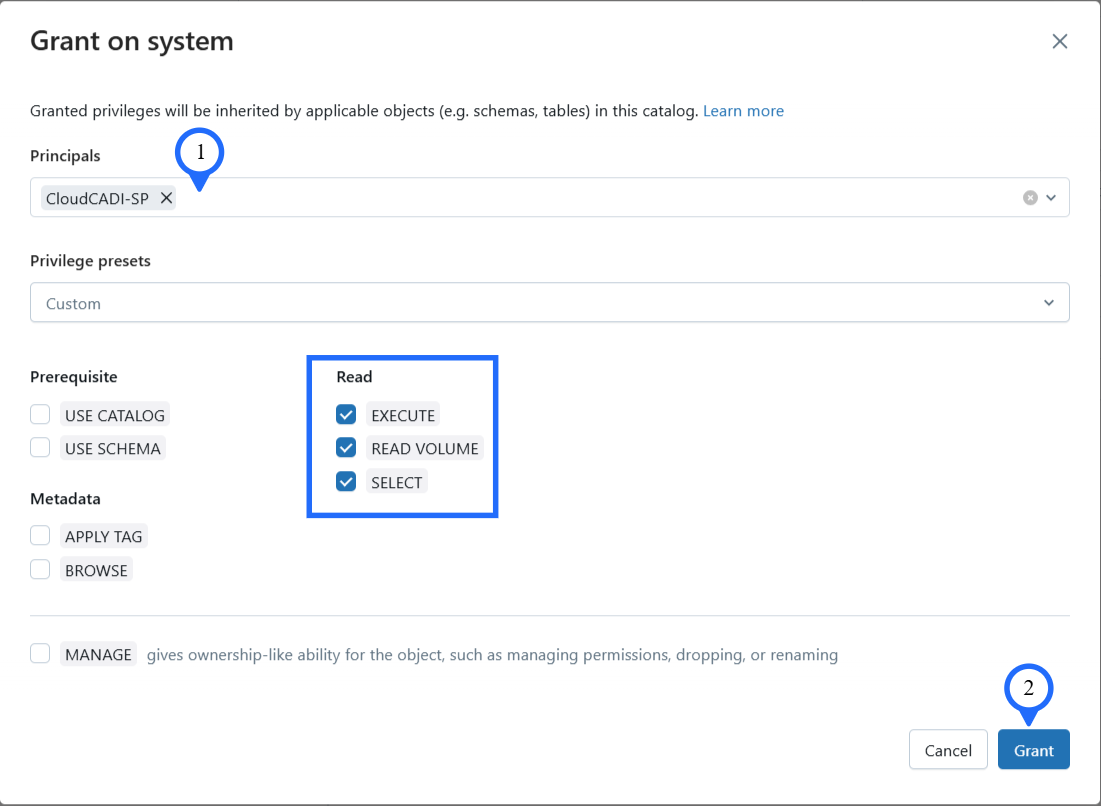
- Click on Catalog -> system schema -> Permission -> Grant.

- Select the created Service Principal in the Principals.
- Check on all Read permissions, then click on Grant.
Note
- User must be a Metastore admin to access grant permission.
4.4.3 CloudCADI Setup
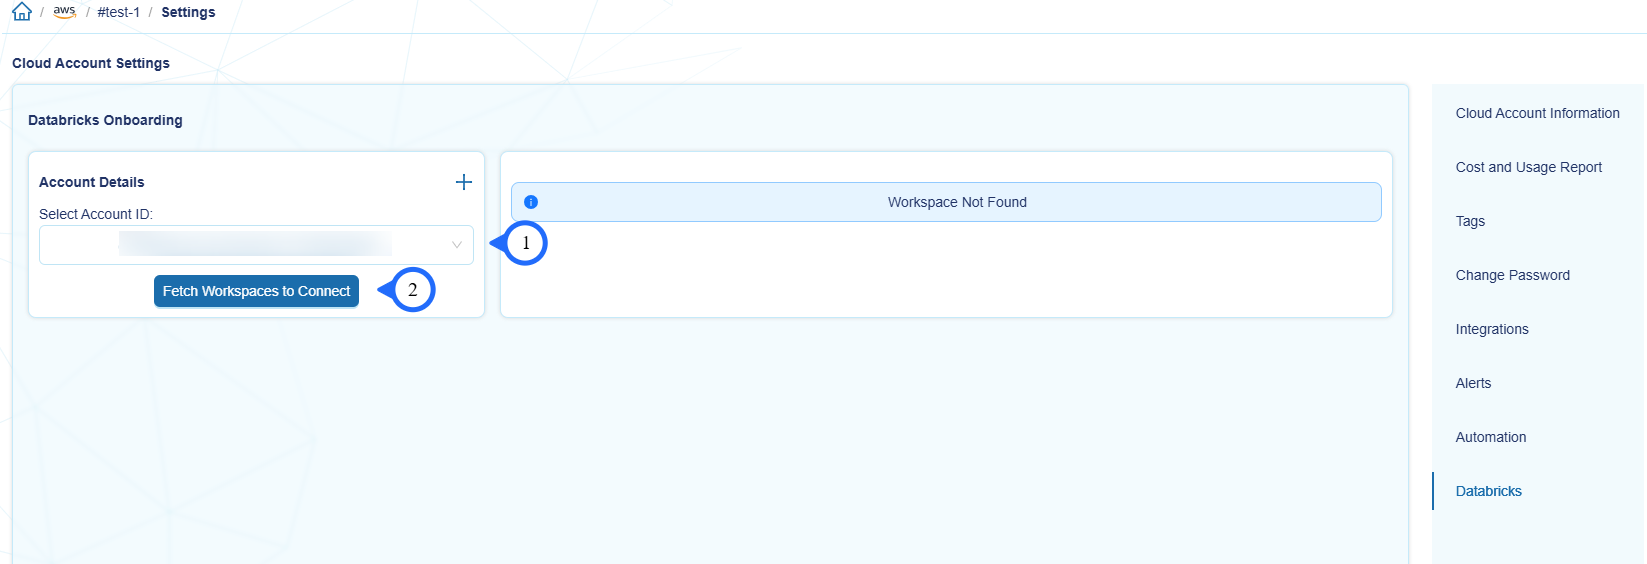
- In CloudCADI click Settings tab, then select the Databricks tab on the right side.
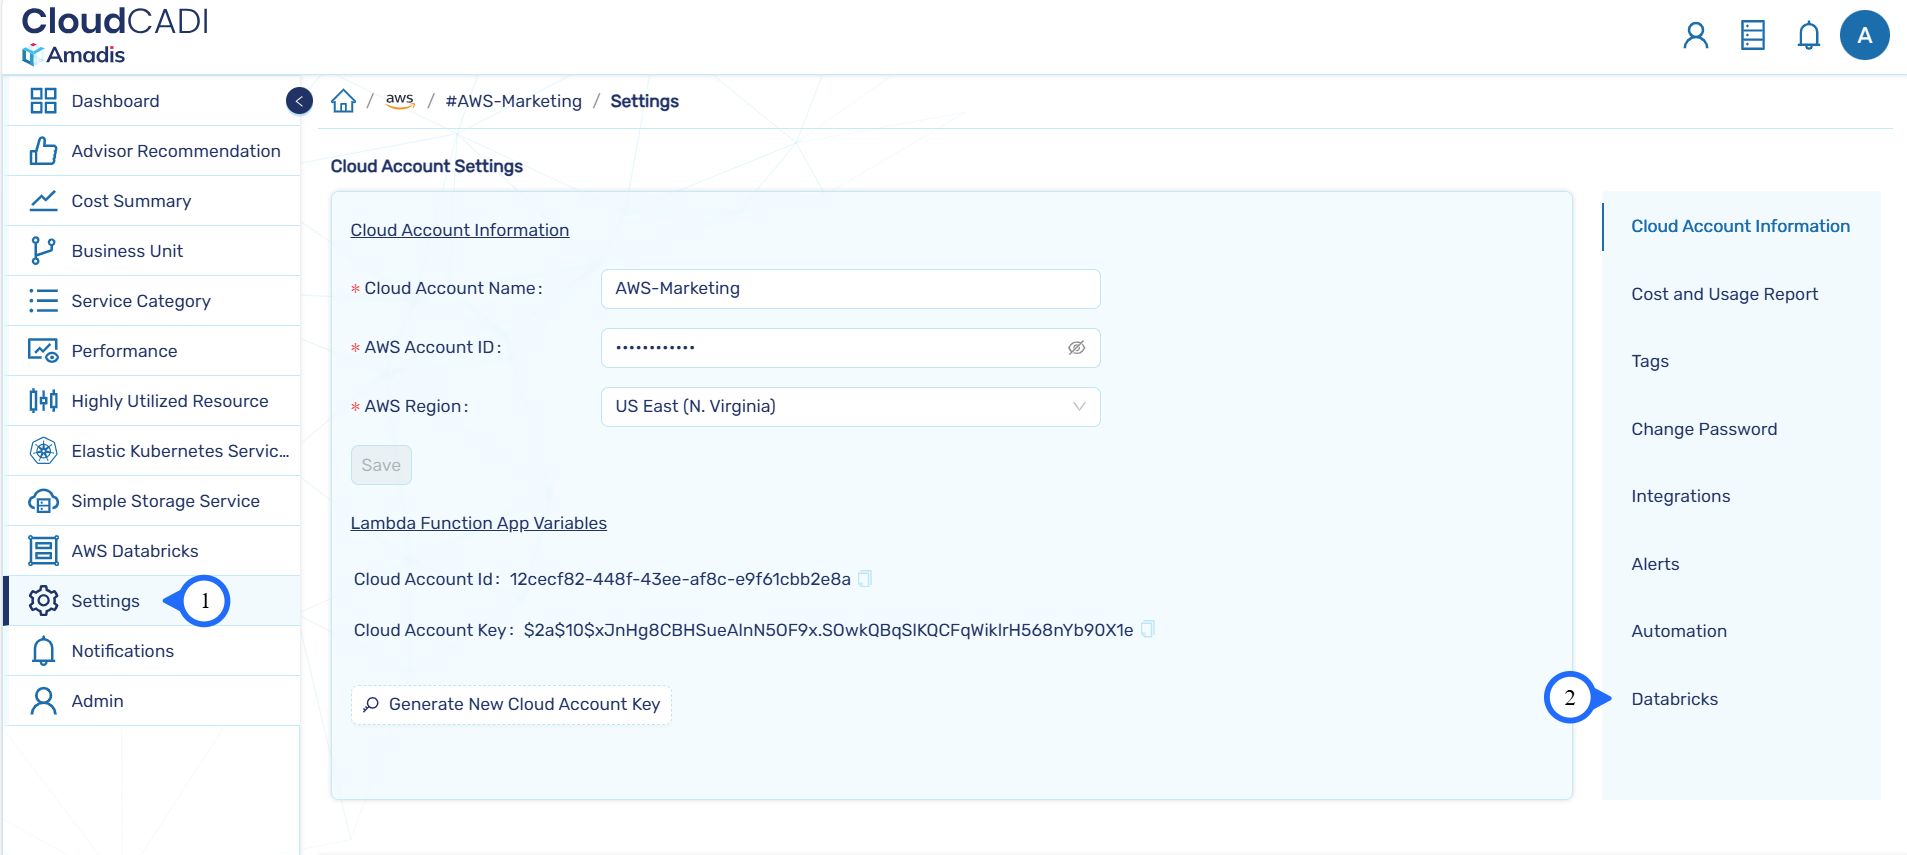
- Enter the copied Account ID, Client ID and Secret details in the respective input and click Done.
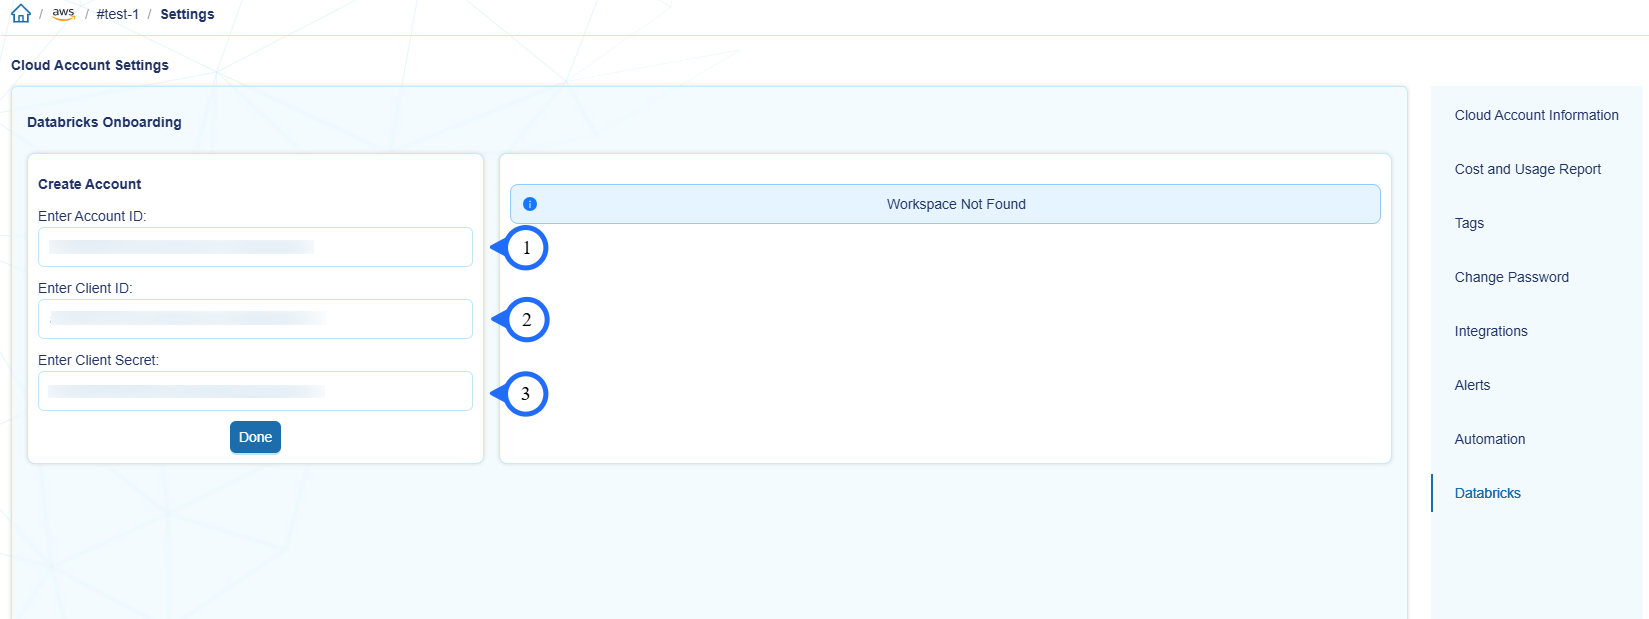
- After successful creation of Databricks account, select the Account ID and click Fetch Workspaces to Connect to view newly available workspaces.
- From the available workspaces, click Connect button to connect with the workspace. After successful connection, cost data for (n-2) date will be updated regularly.

Note
- Service principal will be assigned to the connected Workspace.
- When connecting first workspace, CloudCADI will create a SQL warehouse in the workspace.
- When user connects other workspaces associated with same metastore existing SQL warehouse is used.
- When the user connects workspaces associated with different metastore new SQL warehouse is created.
4.5 S3
4.5.1 Enabling S3 Event Logs
- Go to CloudTrail console -> Trails -> Create trail
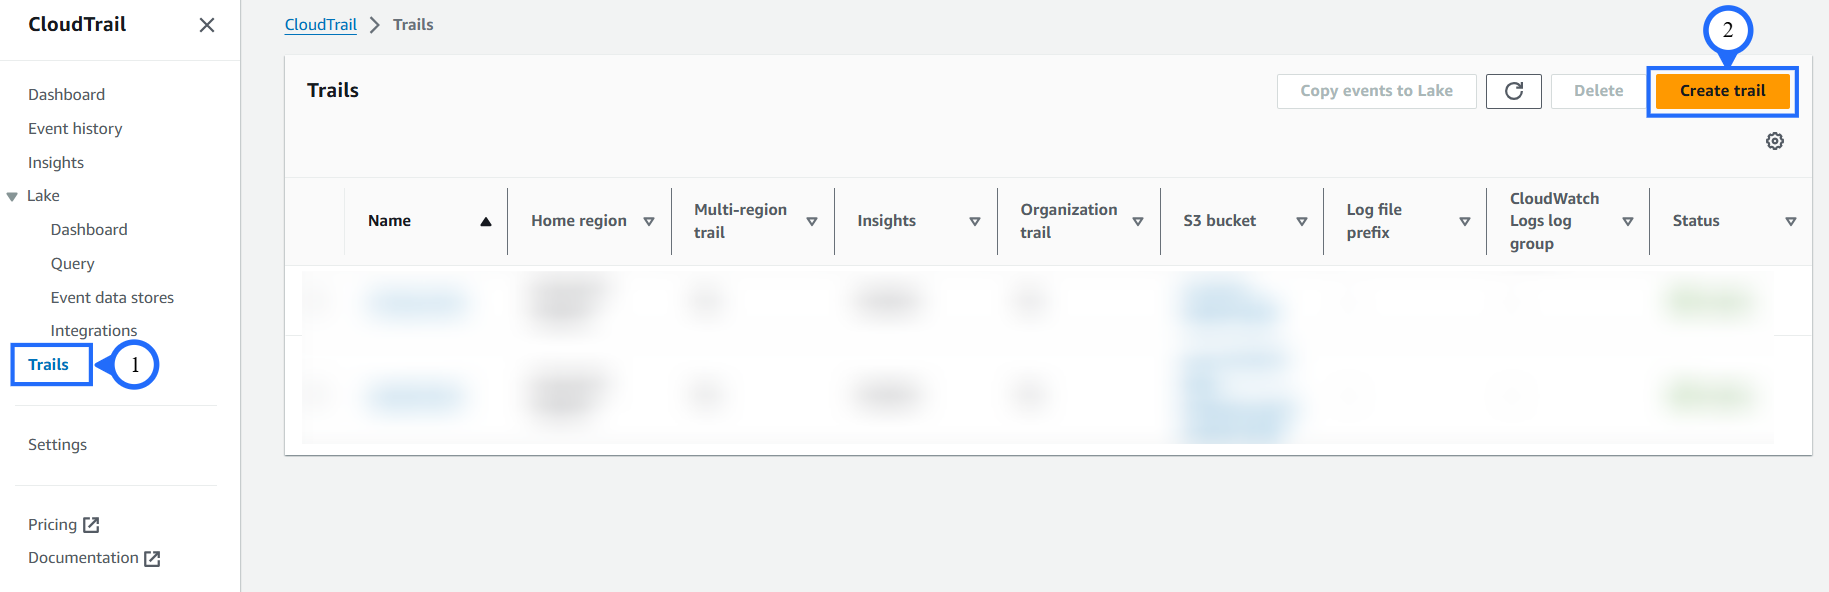
- Trail name : CloudCADI-S3-trail
- If you want to log data event for all accounts then check Enable for all accounts in my organization.
- Storage location: Create new S3 bucket.
- Trail log bucket and folder :enter bucket name as s3-event-logbucket.
- Enter new AWS KMS alias or choose existing one and give Next.
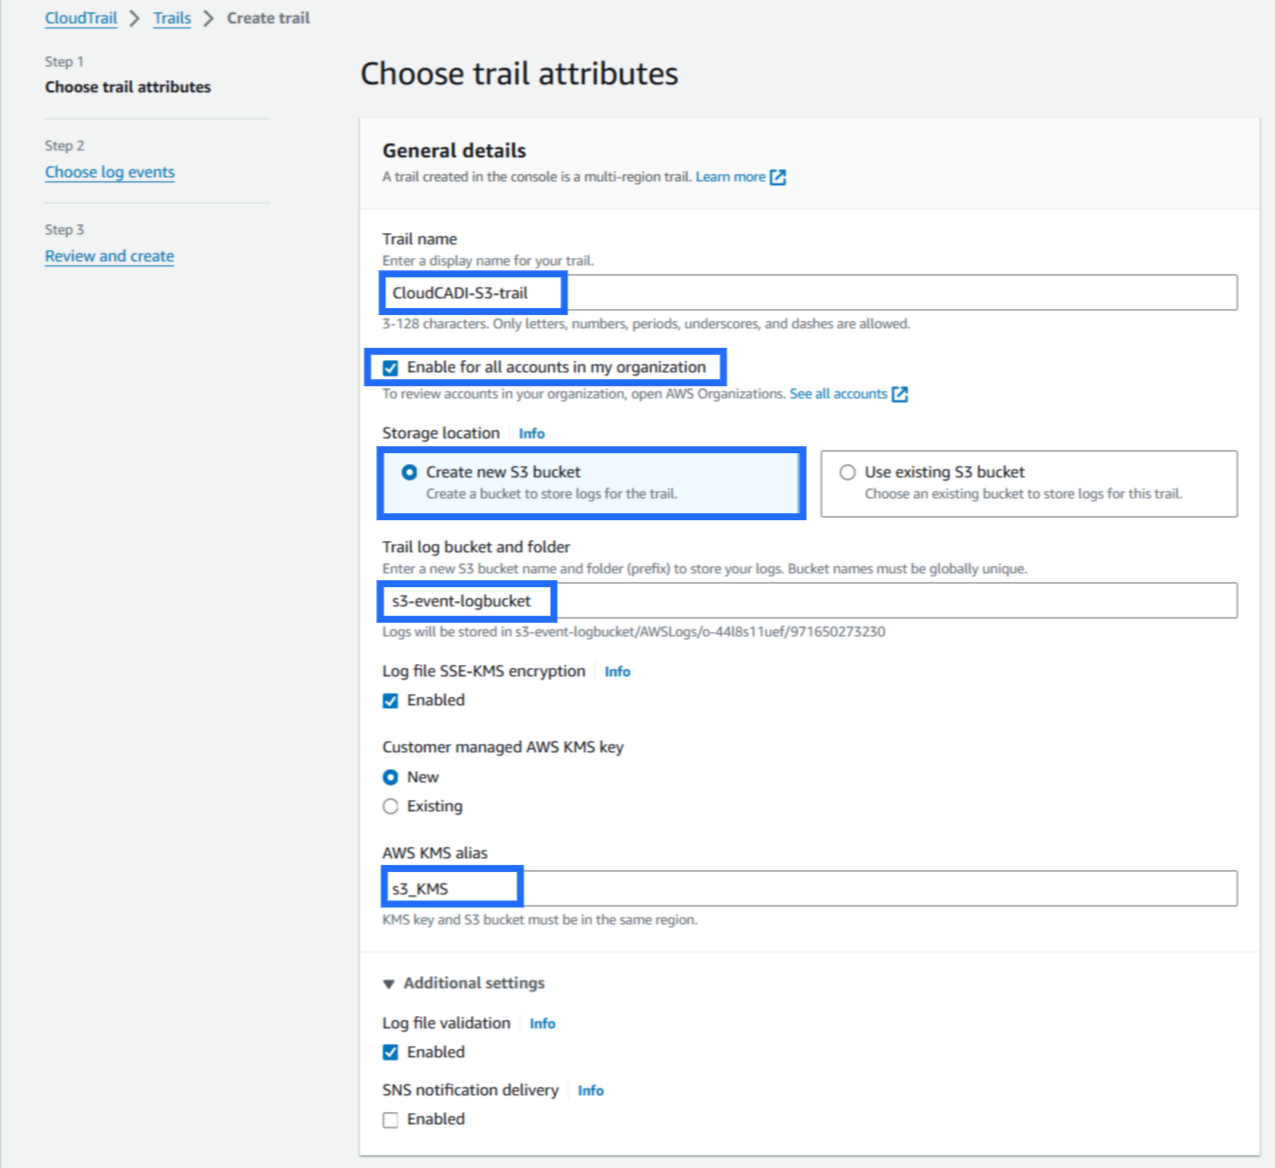
- In Choose log events section uncheck the Management events and check Data events.
- In Data event type select S3 and in Log selector template select Log all events then click Next.

- Now review and click Create trail
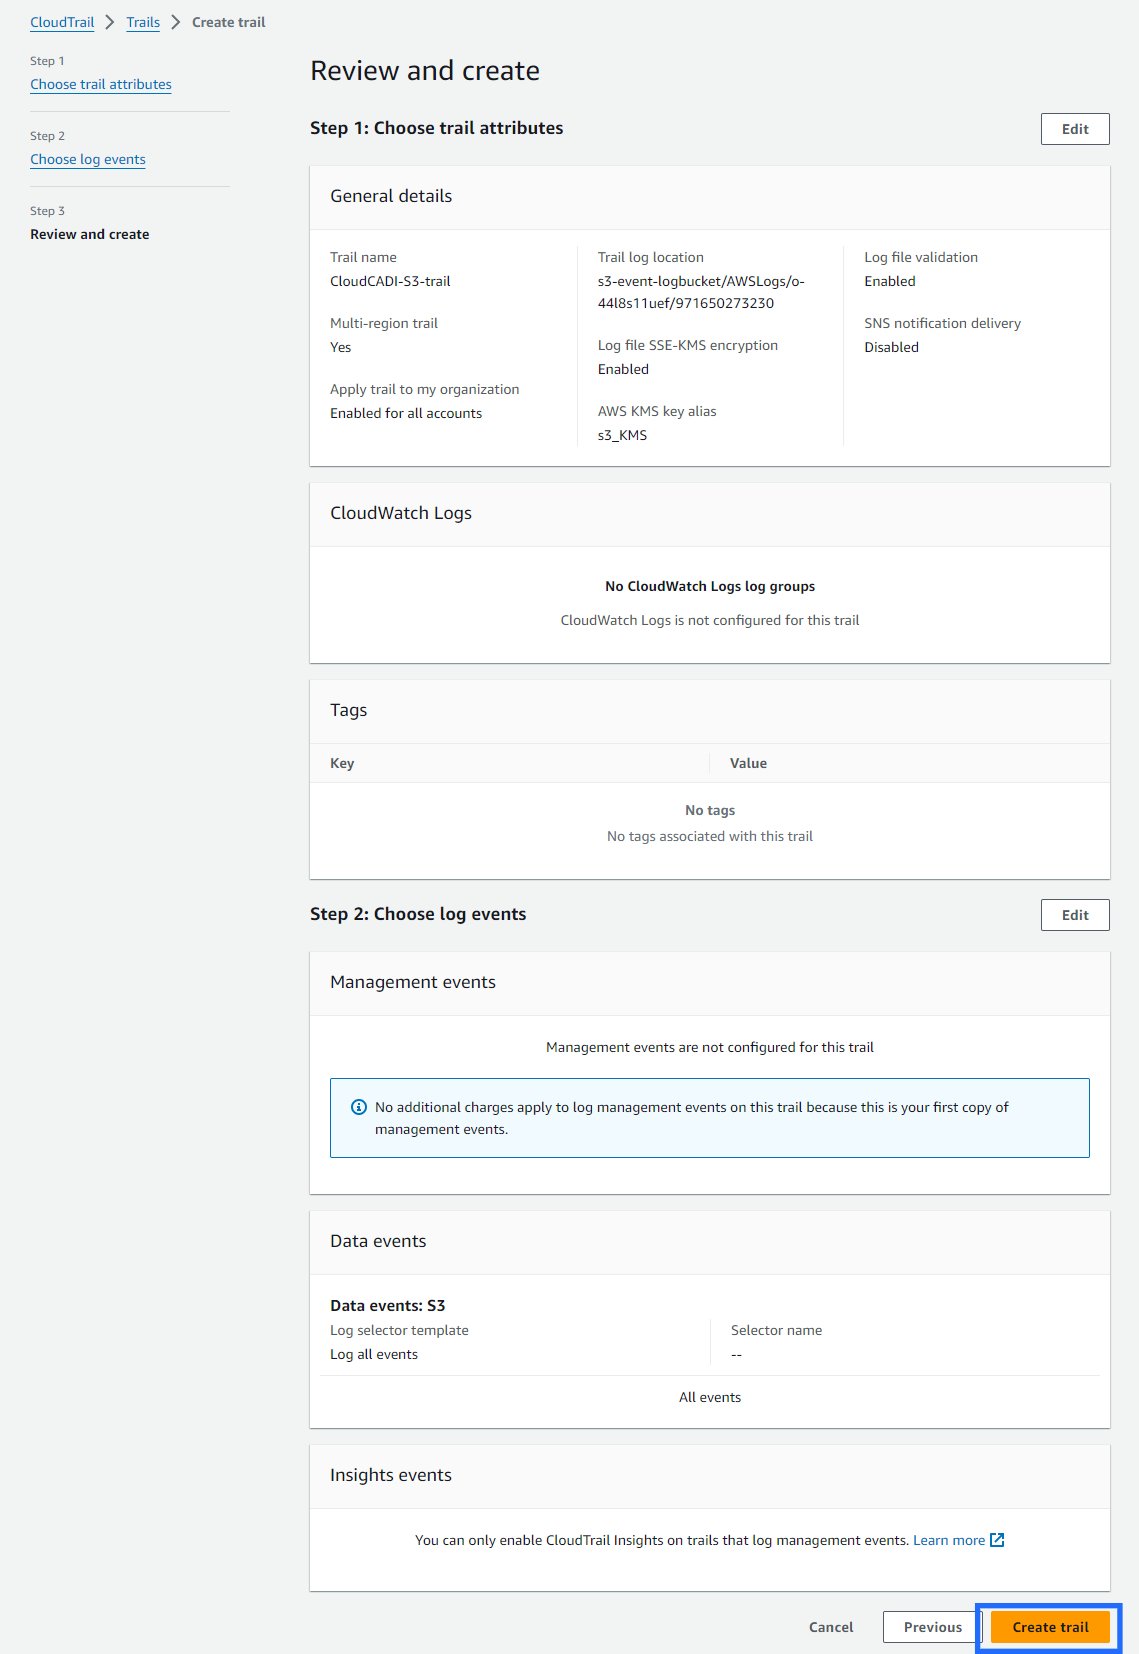
- A trail will be created, and it will start capturing event logs. These logs will be stored in the designated S3 bucket that was specified during the trail creation process.